This post explains how to set up visual studio build tools within a container, including all prerequisites needed to register and run it as agent within the Azure DevOps Server
Introduction
I’ve set up many virtual machines manually as build agents, including all necessary prerequisites. When you apply that approach and start from scratch, you probably do it very carefully: downloading the build tools (right versions of course) and further tools, installing it and if your motivated, you also document all the steps for your colleagues. The virtual machine will be registered as a build agent and in the best case you won’t have to do some adaptions for a long time. But the day comes when you have to do some changes: updating some tools to newer versions, adding a new tool as the technology stack of your solution has grown, etc. If you do not have implemented any automatism according to the provisioning of your build ressources, you’ll have some inhibitions to do that - because you don’t want to destroy your working build agent, you’d slow down the devlopment process, respecitvely in the worst case block it. Furthermore, if you set it up in a manual way, you probably won’t have that many instances as there is much effort necessary for the set up. Therefore, using containerized build agents is a much smoother way: it is transparent which tools you’ve added, it is easy to change them and you’re quite fast when you’d like to implement adaptions. In case of any error, just switch back to your working version (assuming that the Dockerfile is of course version controlled). I’ve implemented my very first containerized build agent a year ago and in this post I’d like to explain a basic approach according to how to do that. The build agent in this example contains Visual Studio 2019 build tools and is capable of registering to an Azure DevOps Server in an automated way.
1. Install Build Tools and Azure Pipelines Agent within a Container
At first, we’re going to set up a Dockerfile including proper instructions for installing the Visual Studio Build Tools 2019 and an Azure Pipelines Agent for registering the container as build agent within an agent pool of the Azure DevOps Server.
1.1 Install Visual Studio 2019 Build Tools
Lucky me, Microsoft already prepared a great manual for setting up the build tools within a container - so my source regarding that can be reached by clicking at that link:
Microsoft - Install Build Tools into a container
So, the example code of this page already contains the necessry instructions to install the build tools. But, we also would like to register the container as an agent at the Azure DevOps Server, therefore we need the Azure Pipelines Agent.
1.2 Install Chocolatey Package Manager
A proper way to install the Azure Pipelines Agent is to use Chocolatey - Package Manager for Windows. At Chocolatey - Step 2 you’ll find the necessary instruction to get Chocolatey installed. In this example we’re going to use the already provided command:
Set-ExecutionPolicy Bypass -Scope Process -Force; [System.Net.ServicePointManager]::SecurityProtocol = [System.Net.ServicePointManager]::SecurityProtocol -bor 3072; iex ((New-Object System.Net.WebClient).DownloadString('https://chocolatey.org/install.ps1'))
I’ve created a script named “installChoco.ps1” in a directory named “scripts” side by side to the Dockerfile and inserted this command. So, the snippet provided by Microsoft will be extended by following instructions:
# Install Chocolatey
ADD "scripts/installChoco.ps1" "C:/scripts/installChoco.ps1"
RUN powershell -File C:\scripts\installChoco.ps1
1.3 Install Azure Pipelines Agent
Now, it is possible to install the Azure Pipeline Agent with Chocolatey, which will be done by following instruction:
# Azure Pipelines Agent (VSTS Build Agent) 2.181.0

RUN choco install azure-pipelines-agent -y
1.4 Dockerfile - First Version
This results to following content of the Dockerfile:
# escape=`

# Use the latest Windows Server Core image with .NET Framework 4.8.
FROM mcr.microsoft.com/dotnet/framework/sdk:4.8-windowsservercore-ltsc2019

# Install Chocolatey
ADD "scripts/installChoco.ps1" "C:/scripts/installChoco.ps1"
RUN powershell -File C:\scripts\installChoco.ps1

# Restore the default Windows shell for correct batch processing.
SHELL ["cmd", "/S", "/C"]

# Download the Build Tools bootstrapper.
ADD https://aka.ms/vs/16/release/vs_buildtools.exe C:\TEMP\vs_buildtools.exe

# Install Build Tools with the Microsoft.VisualStudio.Workload.AzureBuildTools workload, excluding workloads and components with known issues.
RUN C:\TEMP\vs_buildtools.exe --quiet --wait --norestart --nocache `
    --installPath C:\BuildTools `
    --add Microsoft.VisualStudio.Workload.AzureBuildTools `
    --remove Microsoft.VisualStudio.Component.Windows10SDK.10240 `
    --remove Microsoft.VisualStudio.Component.Windows10SDK.10586 `
    --remove Microsoft.VisualStudio.Component.Windows10SDK.14393 `
    --remove Microsoft.VisualStudio.Component.Windows81SDK `
 || IF "%ERRORLEVEL%"=="3010" EXIT 0

# Azure Pipelines Agent (VSTS Build Agent) 2.181.0

RUN choco install azure-pipelines-agent -y

# Define the entry point for the docker container.
# This entry point starts the developer command prompt and launches the PowerShell shell.
ENTRYPOINT ["C:\\BuildTools\\Common7\\Tools\\VsDevCmd.bat", "&&", "powershell.exe", "-NoLogo", "-ExecutionPolicy", "Bypass"]
As mentioned, the core of this Dockerfile consits of already prepared instructions - see Microsoft - Install Build Tools into a container and I’ve just extended the example by the instructions of adding Chocolatey and the Azure Pipeline Agent.
2. Build and Run the Container
Let’s try how the container works, therefore we need to build and run it.
2.1 Building the Container
Use following command for building the container (referecing again the example of Microsoft: Microsoft - Install Build Tools into a container)
docker build -t buildtools2019:latest -me 2GB .
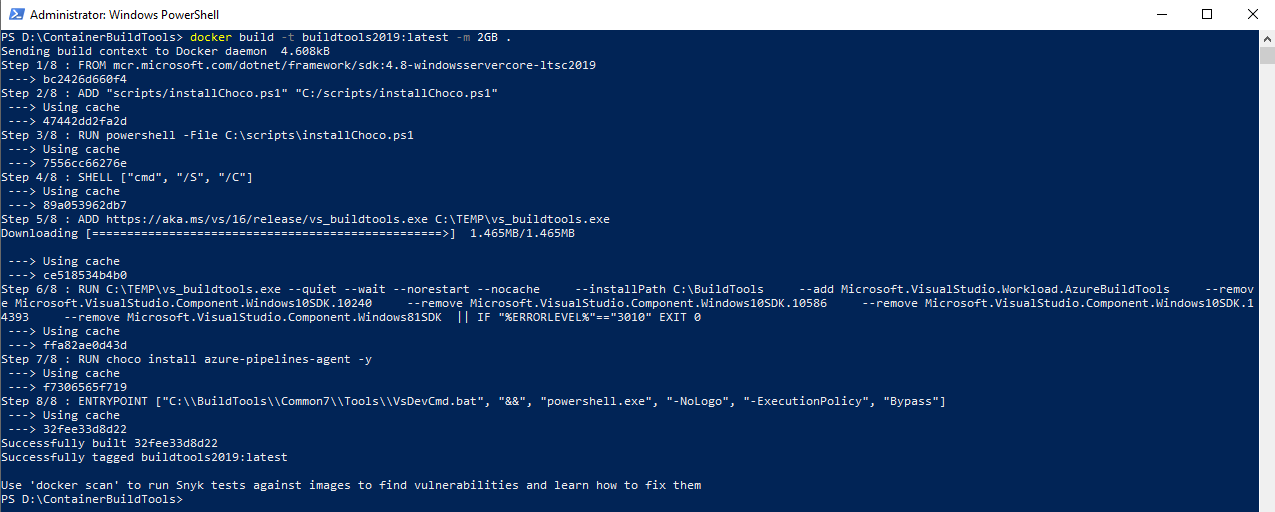
Prove the successfull build by entering the command:
docker images
Afterwards, the image should be listed:

2.2 Running the Container
Enter following command to run the container:
docker run -it buildtools2019
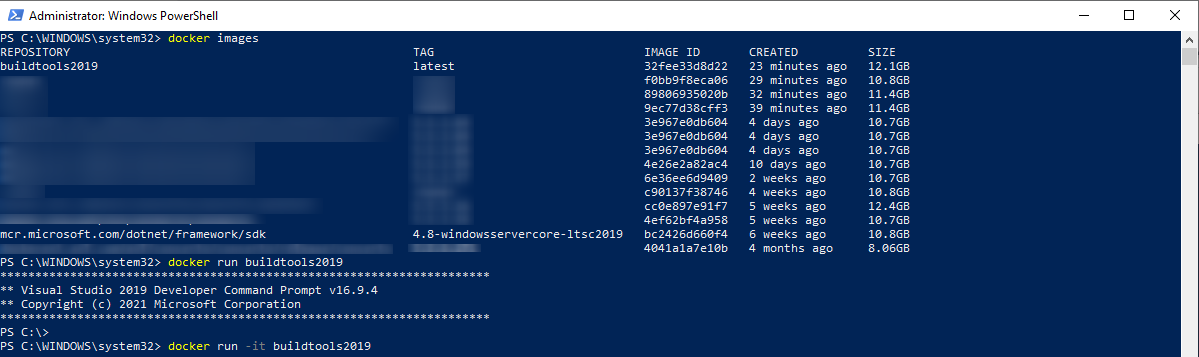
Afterwards, you should get into the filesystem of the container, it can be verified e.g.: with entering “whoami” - the result should be “user manager\containeradministrator”.

3. Registering the Agent - Azure DevOps Server
Of course, the goal should be to register the container as agent within the Azure DevOps Server. In general, all necessary prerequistes are done - except those at the Azure DevOps Server.
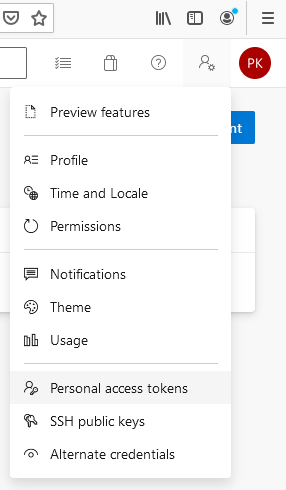
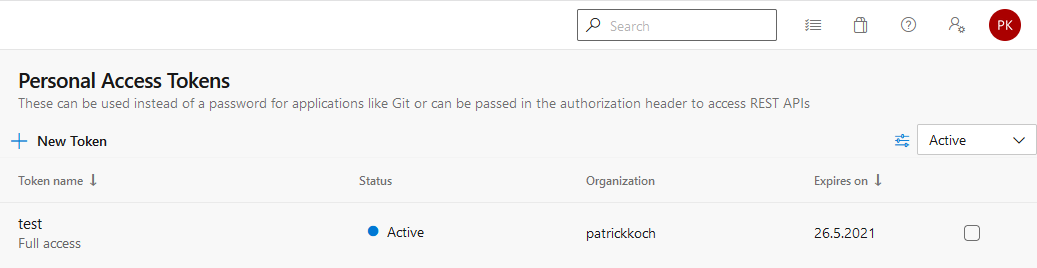
3.1 Create Personal Access Token
There are different ways for registering the agent, I’d prefer to use a PAT - Personal Access Token for doing that. For creating the PAT, click on your profile icon at the Azure DevOps Server and choose “Personal access tokens”
Create now a new token with an arbitrary name, and ensure to enable “Full access”. Store the token at a secure place. As a result you get the PAT listed:
3.2 Create Agent Pool (optional)
An agent needs of course a dedicated agent pool, at which the registration is possible. Therefore I’m going to create a new agent pool for that. Of course you can use an already existing one - just be sure to gain the necessary permissions.
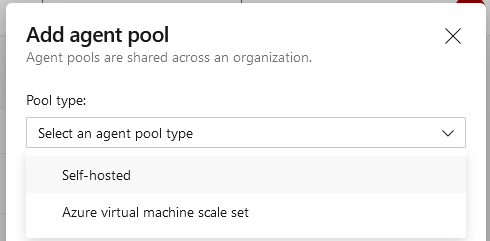
Choose “Self-hosted” at that dialogue…

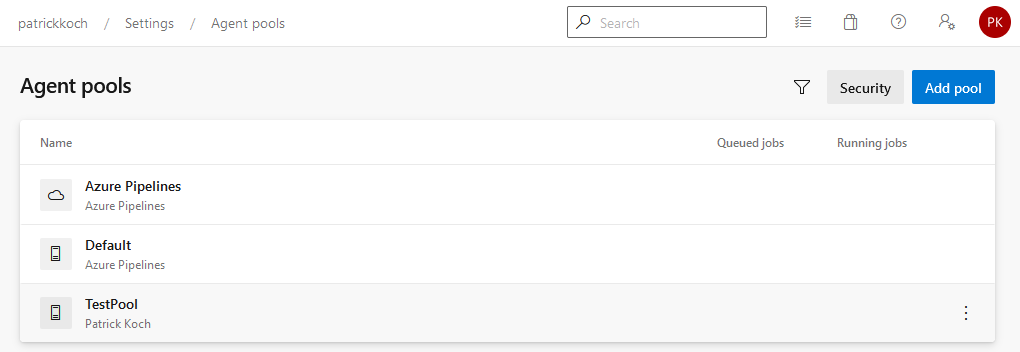
…name it “TestPool” and check “Grant access permission to all pipelines”.
Finally, the Agent Pool is ready to get some agents registered.
3.3 Register the Agent (manual)
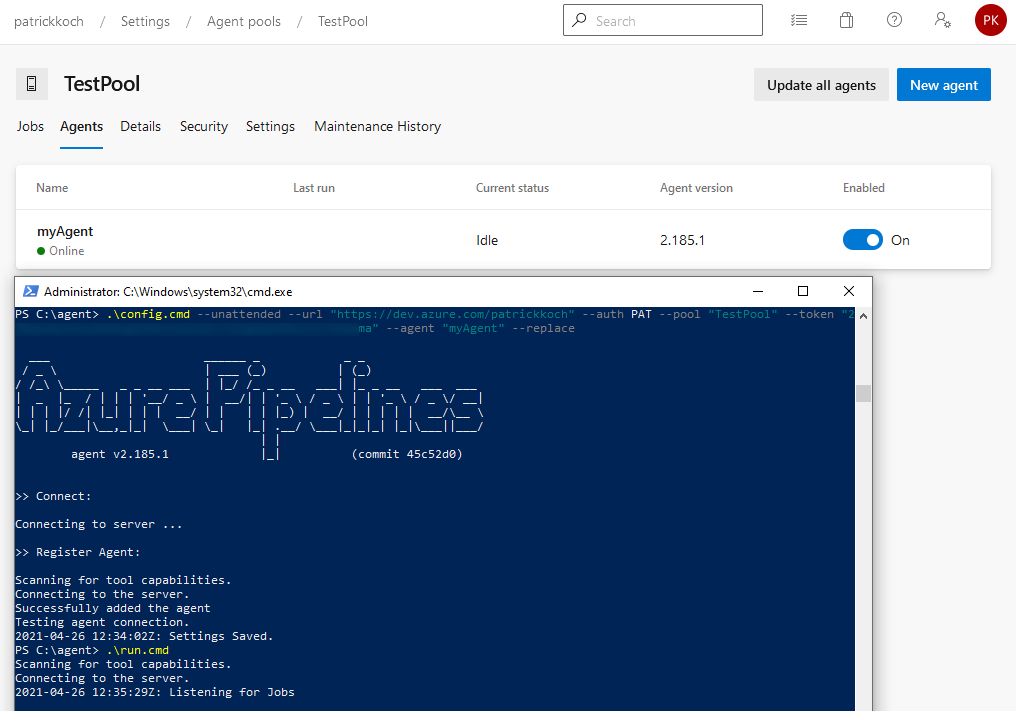
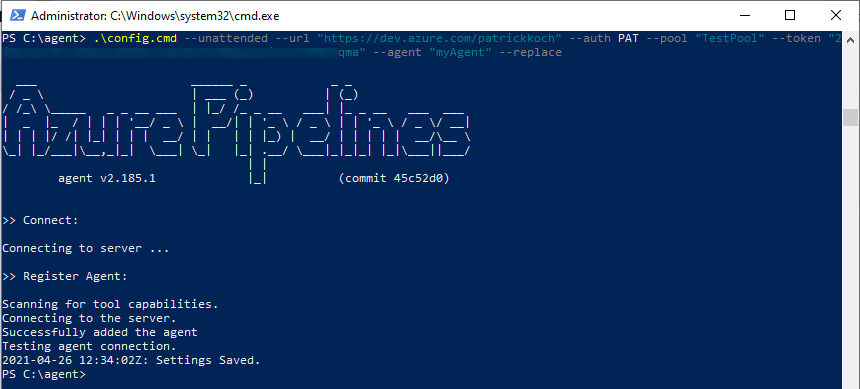
Now the final step would be to register the agent in the agent pool “TestPool”. At the directory “C:\agent”, exists the ‘config.cmd’, which can be used for the registration by passing following command:
config.cmd --unattended --url "https://dev.azure.com/patrickkoch" --auth PAT --pool "TestPool" --token "2**********************a" --agent "myAgent" --replace"
Provide the ‘url’ of your Azure DevOps Server, the name of the agent pool, the PAT and finally the name of the agent (“myAgent” in this example).
So, enter this command and afterwards you should get an output similar to the one shown in the picture below:
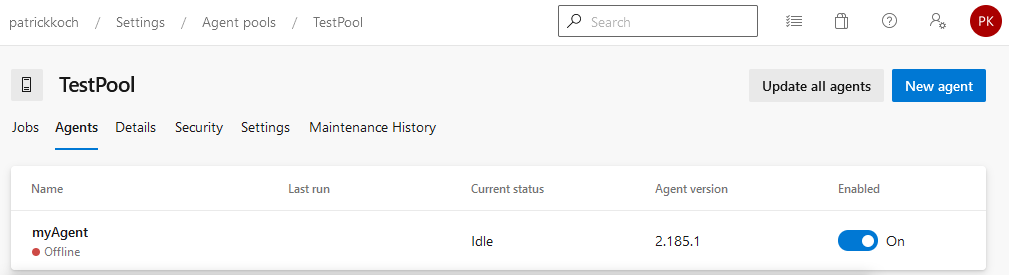
When you switch to the agent pool of your Azure DevOps Server, you should recognize that the pool now contains the agent named “myAgent”.
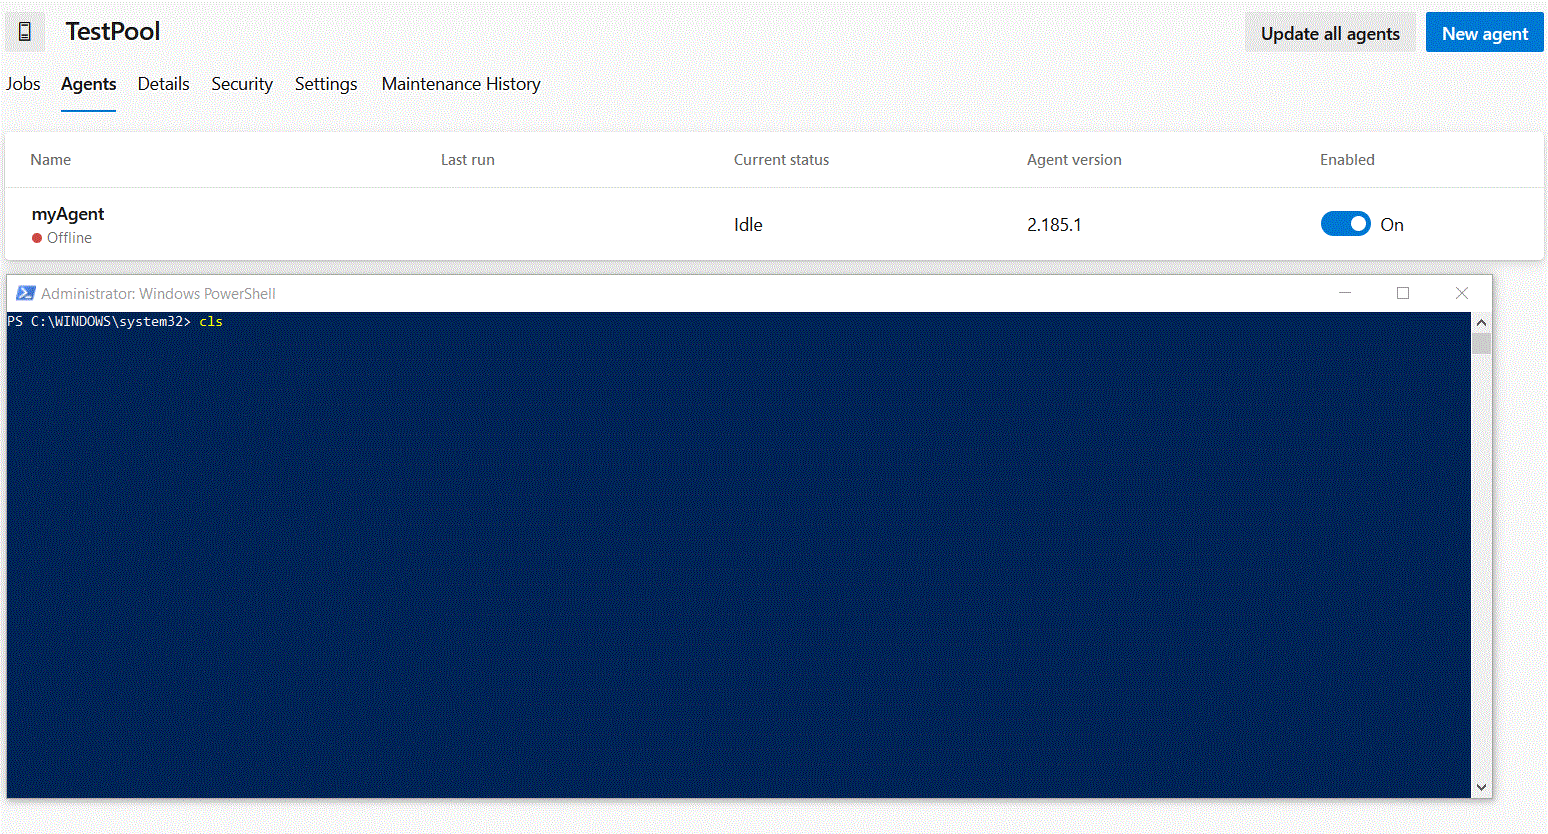
Finally, simple trigger ‘run.cmd’ to get your agent online:
C:\agent\run.cmd
Now, your agent is ready for jobs from pipelines.
By using that implementation, you need to register and run the agent pipeline service in a manual way…that’s of course annoying. A much more better approach would be to get the agent registered and running after the container is successfully deployed, respectively in a running state. That specific implementation is explained in the next chapter, at which we’ll provide additional scripts to the container, which registers and runs the agent. Therefore we need to do some small adaptions…
4. Enable automated registration and running of the Agent
The goal is to register and run the agent pipeline service in an automated way. Therfore we need to adapt the Entrypoint of the Dockerfile and we provide two additonal script files.
4.1 Create register.ps1 and register.bat
‘register.ps1’ will contain the commands which were used for the manual registration and run of the agent.
So the content of this file is shown in the snippet below:
Write-Host "Going to configure Agent..."

Write-Host "C:\agent\config.cmd --unattended --url "https://dev.azure.com/patrickkoch" --auth PAT --pool "TestPool" --token "2************************ma" --agent "myAgent" --replace"

C:\agent\config.cmd --unattended --url "https://dev.azure.com/patrickkoch" --auth PAT --pool "TestPool" --token "2************************ma" --agent "myAgent" --replace

Write-Host "Going to run Agent..."

C:\agent\run.cmd --once
Now we just need another script file, which triggers the Powershell script - ‘register.bat’
@echo off

powershell -File C:\scripts\register.ps1

exit
I’ll store both files within the ‘scripts’ directory, which already contains the script for installing Chocolatey. In addition, we’ve to tell the Dockerfile to deploy it within the container after building it. So, add following instructions within the Dockerfile:
ADD "scripts/register.bat" "C:/scripts/register.bat"
ADD "scripts/register.ps1" "C:/scripts/register.ps1"
4.2 Change the Entrypoint instruction
Finally, the Entrypoint has to be changed: to achieve our goal of the automated registration and run of the agent, our Entrypoint to the container is to call ‘register.bat’ which calls ‘register.ps1’.
Therfore, change to line regarding to the Entrypoint to:
ENTRYPOINT C:/scripts/register.bat
As a result, the Dockerfile is now ready:
# escape=`

# Use the latest Windows Server Core image with .NET Framework 4.8.
FROM mcr.microsoft.com/dotnet/framework/sdk:4.8-windowsservercore-ltsc2019

# Install Chocolatey
ADD "scripts/installChoco.ps1" "C:/scripts/installChoco.ps1"
ADD "scripts/register.bat" "C:/scripts/register.bat"
ADD "scripts/register.ps1" "C:/scripts/register.ps1"
RUN powershell -File C:\scripts\installChoco.ps1

# Restore the default Windows shell for correct batch processing.
SHELL ["cmd", "/S", "/C"]

# Download the Build Tools bootstrapper.
ADD https://aka.ms/vs/16/release/vs_buildtools.exe C:\TEMP\vs_buildtools.exe

# Install Build Tools with the Microsoft.VisualStudio.Workload.AzureBuildTools workload, excluding workloads and components with known issues.
RUN C:\TEMP\vs_buildtools.exe --quiet --wait --norestart --nocache `
    --installPath C:\BuildTools `
    --add Microsoft.VisualStudio.Workload.AzureBuildTools `
    --remove Microsoft.VisualStudio.Component.Windows10SDK.10240 `
    --remove Microsoft.VisualStudio.Component.Windows10SDK.10586 `
    --remove Microsoft.VisualStudio.Component.Windows10SDK.14393 `
    --remove Microsoft.VisualStudio.Component.Windows81SDK `
 || IF "%ERRORLEVEL%"=="3010" EXIT 0

# Azure Pipelines Agent (VSTS Build Agent) 2.181.0

RUN choco install azure-pipelines-agent -y

ENTRYPOINT C:/scripts/register.bat
4.3 Re-Build the Dockerfile
I’ll re-build now the Dockerfile, but with a different tag (that has no meaning, just can also use the ’latest’ tag).
docker run -it buildtools2019:agentregistration

Now, we’re done!
4.4 Run the Container and enjoy
When you now run the container, the agent gets registered and online at the AzureDevOps Server in an automated way:
Conclusion
Based on the example, provided by Microsoft, you just need to add the install of Chocolatey for getting the Azure Pipeline Agent installed in the Container. Generating a PAT allows you to easily register your agent in a dedicated agent pool of the Azure DevOps Server. Containerized build agents allow you a smoother way of handling your build ressources: each prerequisite is transparent by the corresponding instruction, you can extend the build agent by just adding further instructions, scaling the containerized agent is less effort than provisioning multiple virtual machines and you don’t need to worry about when you break something - as the container is created and back online quite fast.
Downloads
The full examples of the first version of the Dockerfile (without automated registration and run of the agent) and the final implementation can be downloaded from GitHub:
https://github.com/patkoch/blog-files/tree/master/post4
Sources
Microsoft: Install Build Tools into a container
Microsoft - Install Build Tools into a container