The intention of this post is to explain how to work with Kubernetes clusters, by using kubectl. Let’s go through a worklow, starting with a provisioned Kubernetes Service until interacting with a created Kubernetes Pod.

1. Introduction
There are several Kubernetes cluster provisioned in your Azure subscription and you need to e.g.: switch between the different cluster for managing their pods? You also need to apply workloads, manually delete pods if they got stuck and sometimes providing files to the pods? This became part of everyday life for me, since my team started with our journey about migrating to the Azure cloud. A indispensable tool for that is kubectl, therefore I’d like to explain my favorite commands for that tool.
1.1 What is kubectl?
kubectl is capable of conducting a huge range of commands against your created Kubernetes clusters.
- Switching between different Kubernetes cluster
- Getting a list of all Kubernetes Pods of a specific cluster
- Applying a Workload on your Kubernetes cluster
- Deleting pods
- ….
1.2 What is the purpose of the kubeconfig?
If you would like to use kubectl, then the proper file, which configures the access to a Kubernetes cluster, is the kubeconfig file - kubectl gets the necessary information out the kubeconfig file.
References
kubernetes.io - organize-cluster-access-kubeconfig
2. Working with kubectl after provisioning a new Kubernetes Cluster
In this chapter, I’d like to go through a use case, in which I’ve provisioned a new Kubernetes cluster in Azure. After that, I’d like to
- obtain the proper access credentials for the newly created cluster (done with the Azure CLI)
- list all available contexts (get a list of all clusters)
- switch between different clusters
- get a list of all pods of a cluster
- apply a workload at the cluster
- attaching a running pod
- copy files from my local file system to the running pod
2.1 After provisioning a Kubernetes Cluster - Get the Access Credentials (az aks get-credentials)
It starts with provisioning a new Azure Kubernetes Service - what would be the first step? You need to get the credentials of that newly created Kubernetes Service in your kubeconfig file.
In my case, it would be about the Azure Kubernetes Service named “smiling-cowbird-aks”.

For that, you’d need a different CLI tool - the Azure CLI. The Azure CLI allows you to manage your dedicated Azure resources.
Conduct following command for getting the corresponding credentials of the cluster in your kubeconfig file:
az aks get-credentials --name <K8s Cluster> --resource-group <Resource Group>

References
https://docs.microsoft.com - azure cli
https://docs.microsoft.com - aks-get-credentials
2.2 Get a list of your contexts (kubectl config get-contexts)
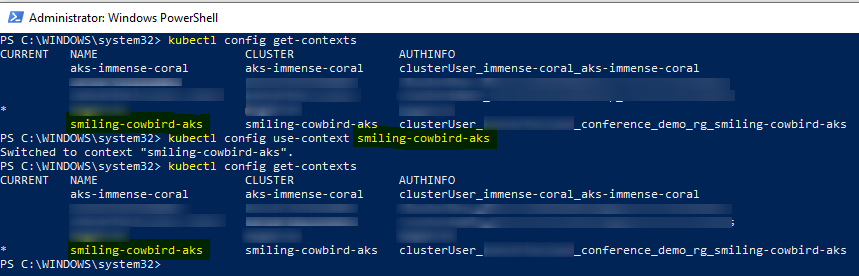
After conducting the previous command, the “smiling-cowbird-aks” was set as current context. So, the kubeconfig file was updated. Conducting the next command, shows you a list of your contexts and reveals the current context - which is marked in the “CURRENT” column.
kubectl config get-contexts

So, as mentioned, the “smiling-cowbird-aks” is set a current context. All conducted kubectl commands are applied at that specific AKS.
References
https://kubernetes.io - cheatsheet - kubectl-context-and-configuration
2.3 Switch between contexts (kubectl config set-context)
If you’d like to switch between your listed contexts, you’ve to conduct following command which allows you to switch between your different contexts:
kubectl config use-context <K8s cluster>
In the picture below, you can observe that my current context was not the “smiling-cowbird-aks”, it was a different context. By conducting the mentioned command, it is possible to switch to the “smiling-cowbird-aks” context. Now this context is the current one.
References
https://kubernetes.io - cheatsheet - kubectl-context-and-configuration
2.4 Get a list of your pods (kubectl get pods)
Reveal the running/completed/etc. pods of your context - this can be done with following command:
kubectl get pods
This would result to following example output in my case:
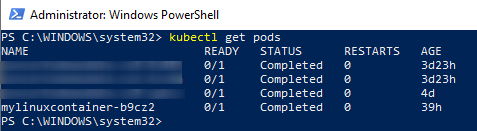
At this AKS, already four different pods were run. They are already completed - which can be observed at the “STATUS” column.
References
https://kubernetes.io - cheatsheet - viewing-finding-resources
2.5 Apply a workload from type job (kubectl apply -f)
Let’s apply a workload from type “job” at the Kubernetes service - to get a running pod:
kubectl apply -f <workload-file.yaml>
My proper YAML file, which defines the workload, is located at following path:
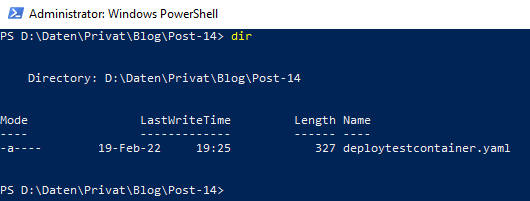
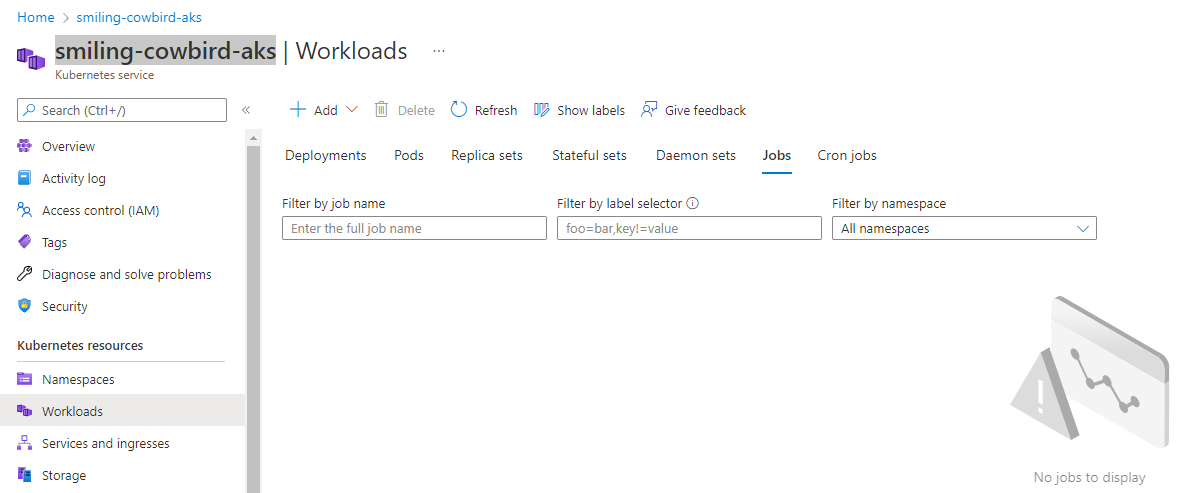
Let’s prove, that there is really no job running at the AKS, I’ll switch to the Azure Portal:
Now, let’s apply the workload using the mentioned kubectl command:

This creates the job, respectively the corresponding workload at the AKS:
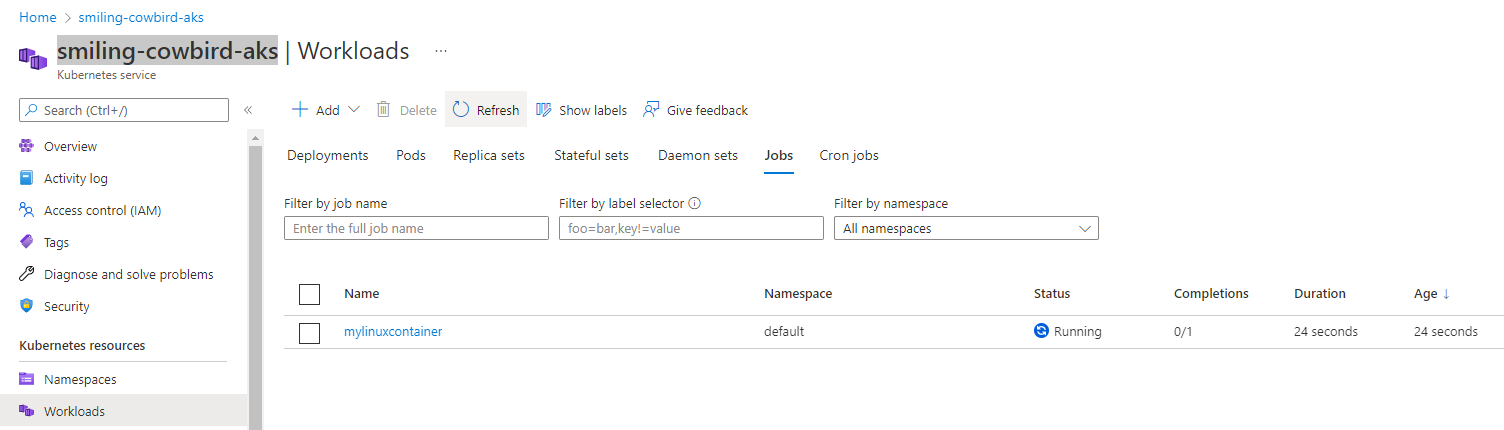
As you can see in the picture above, the Job “mylinuxcontainer” is running. Let’s also prove it by using the kubectl get pods command:
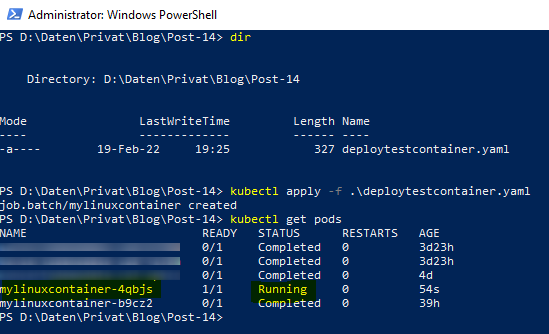
This reveals that the “mylinuxcontainer-4qbjs” is running for 54 seconds. Be aware: “mylinuxcontainer-4qbjs” is the name of the pod, the workload is named ““mylinuxcontainer” only.
References
https://kubernetes.io - cheatsheet - kubectl-apply
2.6 Attach the Kubernetes Pod (kubectl exec —stdin —tty)
As a job, respectively the corresponding pod is now running - let’s attach the container to get access to it’s file system. This is done by using following command:
kubectl exec --stdin --tty <name of the pod> -- <entry command>
In my case, for the running “mylinuxcontainer-v2xtwq”, I’ve to conduct following command as seen in the picutre below:
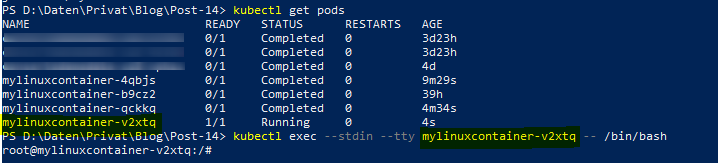
In the last line, you can recognize that I’m now inside the file system of the Kubernetes Pod named “mylinuxcontainer-v2xtwq”. If you’d like to finish attaching the Pod, simple enter “exit”.
References
https://kubernetes.io - cheatsheet - interacting-with-running-pods
2.7 Delete a Kubernetes Pod (kubectl delete pod —force)
Sometimes it might occur that one of your running pods is getting stuck. Forcing to delete it cloud be solution:
kubectl delete pod <name of the pod> --force
E.g.: for deleting the pod named “mylinuxcontainer-trh6z”, I’ve to conduct the command seen in the picture below:

This forces the Pod to be deleted. Simply apply the workload again in that case for creating a new Pod.
References
https://kubernetes.io - cheatsheet - deleting-resources
2.8 Copy a file to the Kubernetes Pod (kubectl cp)
My last command is used for copying files from your file system to the running Kubernetes Pod. Might be useful for some investigations, for avoiding to build the Container several times to provide a file. An alternative to map your local file system to the Pod. But for a simple copy task, use following command:
kubectl cp <file to copy> <name of the pod>:/target path/
In my case, I’m going to copy a simple text file named “sampleFile.txt” to the file system of the Pod:
Using “cat” reveals the content of the text file, which is now available on the Pod.
References
https://kubernetes.io - cheatsheet - copy-files-and-directories-to-and-from-containers
3. Conclusion
Getting to know some essential kubectl commands makes your life easier, if you’d like to work with Kubernetes cluster. There are just three things to do: install kubectl and ensure that you get your kubeconfig file, which will be adapted for each provisioned Kubernetes cluster, you’ d like to work with. Finally: conduct kubectl commands and figure out how they behave.
References
kubernetes.io - organize-cluster-access-kubeconfig
https://kubernetes.io - cheatsheet - kubectl-context-and-configuration
https://kubernetes.io - cheatsheet - viewing-finding-resources
https://kubernetes.io - cheatsheet - kubectl-apply
https://kubernetes.io - cheatsheet - interacting-with-running-pods
https://kubernetes.io - cheatsheet - deleting-resources
https://kubernetes.io - cheatsheet - copy-files-and-directories-to-and-from-containers