The intention of this post is to explain how to provision an Azure Kubernetes Service, an attached Azure Container Registry with Terraform and how to deploy a Linux Workload by using dedicated kubectl commands
Update (2nd of May 2022): added YouTube video
Video - Watch the content of the post in my YouTube Video
1. Introduction
This post is intended for you, if you’d like to know how to provision an Azure Kubernetes Service and an Azure Container Registry by using Infrastructure as Code approaches. The selected tool for that approach is Terraform. Furthermore it is explained how to push a Linux Container Image to the Azure Container Registry and how a Workload can be deployed at the Kubernetes Service by using the Kubernetes command-line tool kubectl.
2. Prerequisites
What needs to be done before the provisioning?
2.1 Tools
Ensure you’ve following installed:
In addition you need an active Azure subscription.
Once all of this is done, you’re ready to start.
If you’re working with multiple Azure subscriptions, prove by entering following command, that you’ve selected the desired subscription:
az account show
The output should be similar like shown in the picture below:

If you’d like to set a different subscription, use following command:
az account set --subscription "<desired subscription>"
See also the related documentation: docs.microsoft.com - az-account-set
2.2 Example Linux Container
You need an example Linux Container for the whole use case, which corresponding Container Image is managed by the Azure Container Registry after pushing it. I’ve created a simple example Container, which just prints “Hi, I’m your Linux Container!” and terminates after two minutes.

You can download the Dockerfile from my GitHub Repo:
github.com - patkoch - linux-container-simple
3. Provisioning of the Ressources with Terraform
In this section, I’m going to explain the Terraform configuration file and the dedicated commands for conducting the provisioning.
3.1 The Terraform Configuration File
The mentioned Terraform configuration file can be seen in the code snippet below, respectively you can clone my GitHub repository: github.com - patkoch - terraform-aks-acr . It allows to provision an Azure Kubernetes Service and an attached Azure Container Registry, including the mandatory Resource group and the Role Assignment.
The sources of this configuration file can be seen below:
registry.terraform.io - kubernetes cluster
registry.terraform.io - container registry
I’ve just done some minor adaptations, but let’s go through the file by explaining each resource.
- azurerm_resource_groug “patricks-rg”: This resource defines a Resource group, which is named “patricks_blog_acr_aks_rg”. Both, the Azure Kubernetes Service and the Azure Container Registry need to refer to a Resource group.
- azurerm_container_registry “patricks-acr”: Defines the Container Registry for managing the Container Image(s). The Container Registry will be named “patricksblog”.
- azurerm_kubernetes_cluster “patricks-k8s-cluster”: The Azure Kubernetes Service, named “patricks-aks”. This Kubernetes cluster will contain Linux Nodes only. In this post, I’ll show you how to deploy a Workload at this cluster.
- azurerm_role_assignment “enablePulling”: As the name indicates, this resource allows the Kubernetes Cluster “patricks-aks” to pull Container Images from the Container registry “patricksblog”.
terraform {
  required_providers {
    azurerm = {
      source  = "hashicorp/azurerm"
      version = "~> 2.65"
    }

    random = {
      source  = "hashicorp/random"
      version = "3.1.0"
    }
  }
}

provider "azurerm" {
  features {}
}

resource "azurerm_resource_group" "patricks-rg" {
  name     = "patricks_blog_acr_aks_rg"
  location = "Germany West Central"
}

resource "azurerm_container_registry" "patricks-acr" {
  name                = "patricksblog"
  sku                 = "Premium"
  resource_group_name = azurerm_resource_group.patricks-rg.name
  location            = azurerm_resource_group.patricks-rg.location
}

resource "azurerm_kubernetes_cluster" "patricks-k8s-cluster" {
  name                = "patricks-aks"
  location            = azurerm_resource_group.patricks-rg.location
  resource_group_name = azurerm_resource_group.patricks-rg.name
  dns_prefix          = "patricks-dns"

  default_node_pool {
    name       = "default"
    node_count = 1
    vm_size    = "Standard_D2_v2"
  }

  identity {
    type = "SystemAssigned"
  }

  tags = {
    Environment = "Production"
  }
}

resource "azurerm_role_assignment" "enablePulling" {
  principal_id                     = azurerm_kubernetes_cluster.patricks-k8s-cluster.kubelet_identity[0].object_id
  role_definition_name             = "AcrPull"
  scope                            = azurerm_container_registry.patricks-acr.id
  skip_service_principal_aad_check = true
}
3.2 Applying the Terraform Commands
Let’s conduct the provisioning of the four mentioned resources in Azure by applying the specific Terraform commands.
Open Windows PowerShell, change the directory to the location of the Terraform configuration file and enter following command for establishing the connection to the backend…
terraform init
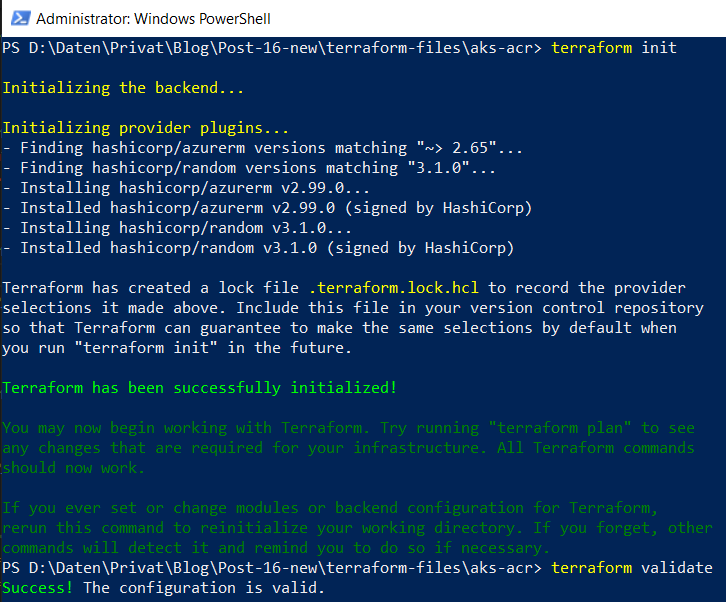
…and in addition also prove whether the file is valid by entering:
terraform validate
The resulting logs should be similar as in the picture below:
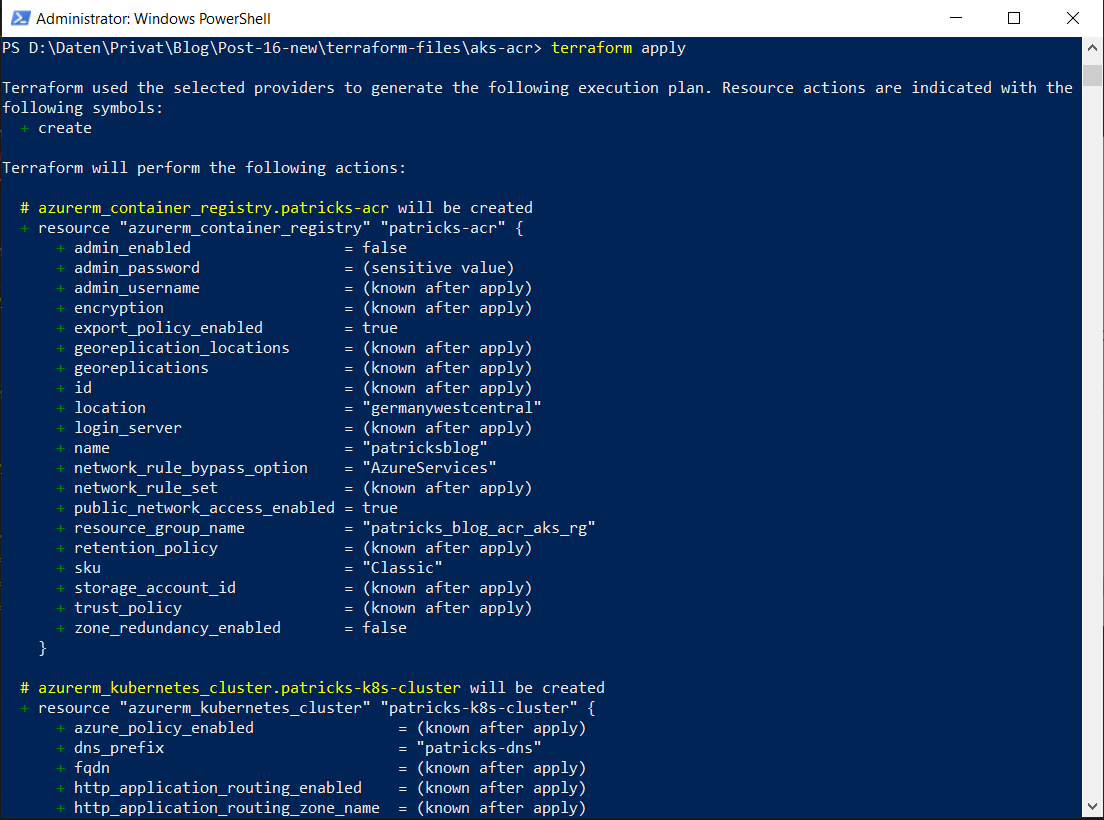
The final command for triggering the creation of the resources is:
terraform apply
Enter that command, the logs will provide you an overview about the resources, which will be provisioned. Confirm that by typing “yes”.
This takes a few minutes, so relax and let Terraform work for you until you see following log:

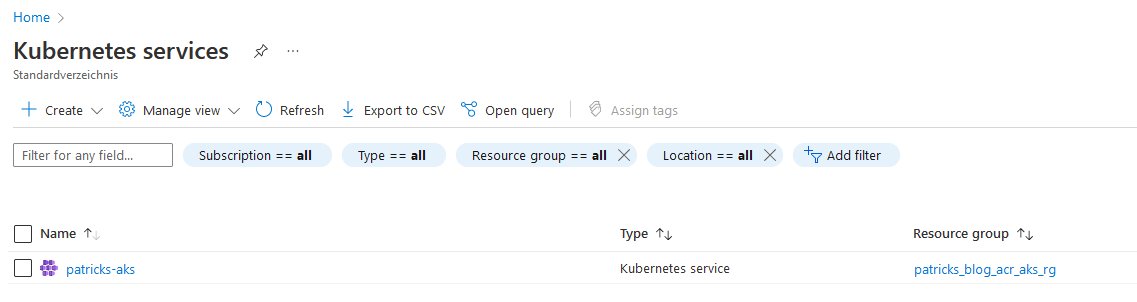
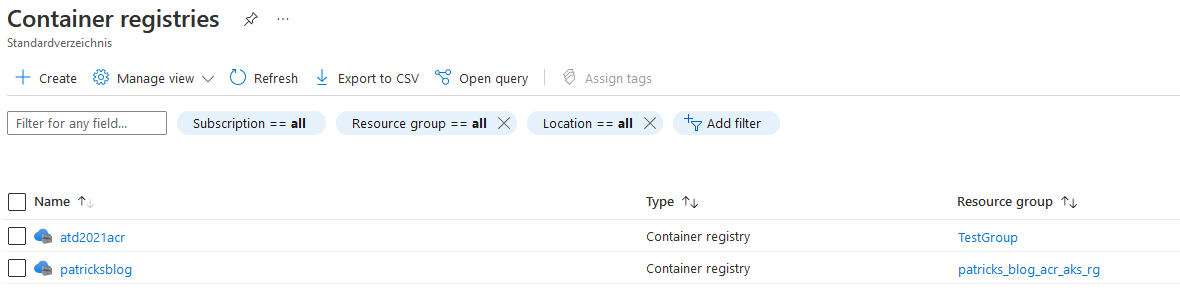
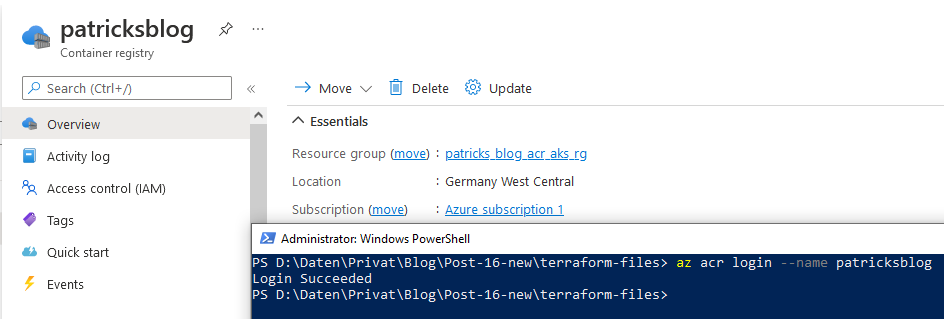
After the provisioning, verify in the Azure portal that all resources are created.
Among others, the Kubernetes Service…
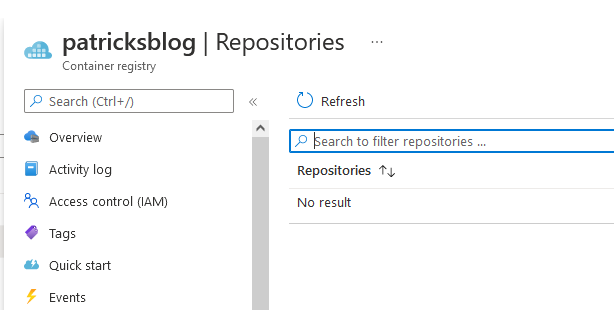
…and the Container registry:
As I’ve ceated a new Kubernetes service, I need also to update my kubeconfig file - because I’d like to deploy workloads at this cluster but my kubeconfig file does not have a clue that this newly created Kubernetes service exists.
Therefore, run following command:
az aks get-credentials --name patricks-aks --resourcegroup patricks_blog_acr_aks_rg
I’ve already created an instance of a Kubernetes cluster before, using the same name, therefore I’ll be asked whether I’d like to overwrite it in my kubeconfig file.

You can verify, whether this cluster is now set as current cluster by conducting following command:
kubectl config get-contexts

I’m now done according to the Kubernetes related settings. Let’s switch to the Container Registry.
4. Pushing the Container Image to the Container Registry
The Container registry was created too, but it’s empty - there is no Container Image available. Let’s change that by uploading a Container Image to the Container registry. As mentioned before, I’ll use the corresponding Container Image of my simple Linux Container example.
4.1 Login to the Container Registry
At first, I need to login to the Container registry. Use following command for that:
az acr login --name patricksblog
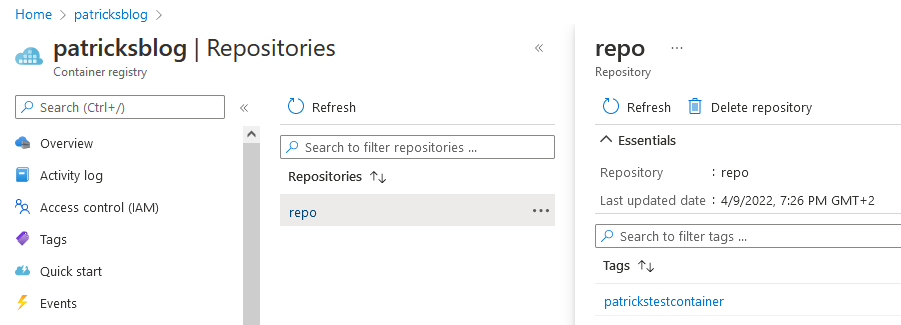
After that, I’ve to tag my Container Image properly: “patricksblog.azurecr.io/repo:patrickstestcontainer”.
The next step would be to upload the newly tagged Container Image to “patricksblog”, by using following command:
docker push patricksblog.azurecr.io/repo:patrickstestcontainer

When the upload is done, you should be able to see the Container Image at the Container registry:
Now, also the Container Registry is done - so let’s switch to the probably funniest part - let’s deploy Workloads at our newly created infrastructure!
5. Deployment of the Linux Workload
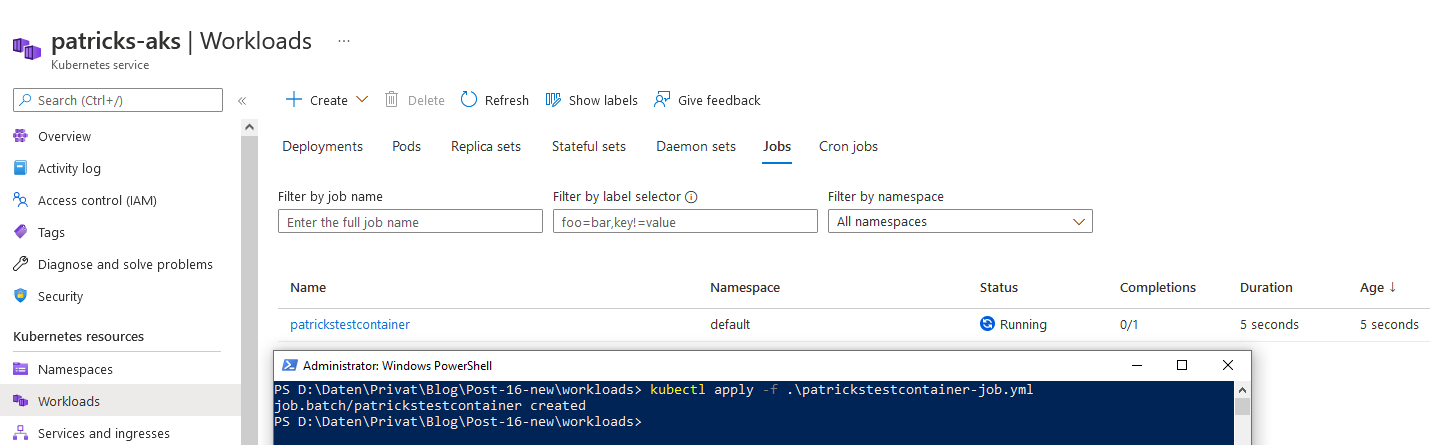
The YAML snipped below describes a Job configuration. The “image” refers to the already pushed Container Image, the name of the Container is “patrickstestcontainer”. Now it is time to bring the Container alive at the Kubernetes cluster.
apiVersion: batch/v1
kind: Job
metadata:
  name: patrickstestcontainer
spec:
  template:
    spec:
      containers:
      - name: patrickstestcontainer
        image: patricksblog.azurecr.io/repo:patrickstestcontainer
      nodeSelector:
        kubernetes.io/os: linux
      restartPolicy: Never
  backoffLimit: 4
For that, save the YAML snippet as “patrickstestcontainer-job.yml” or clone my GitHub repository github.com - patkoch - k8s-workload-job-config-example, start a “Windows PowerShell”, change to the directory of the .yml file and conduct following command:
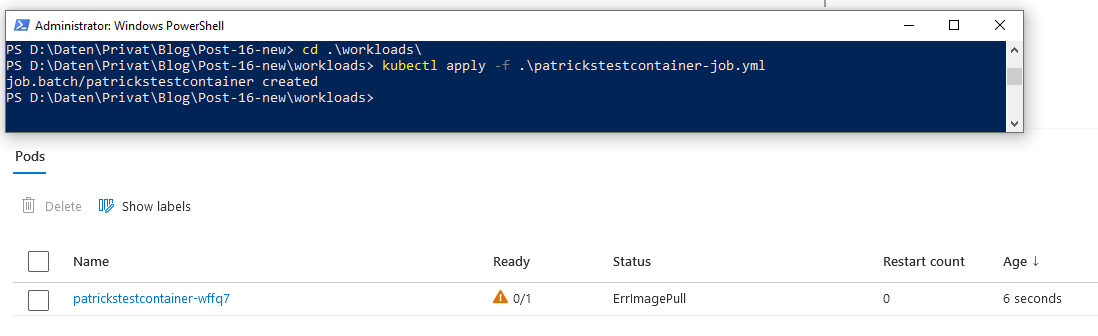
kubectl apply -f .\patrickstestcontainer-job.yml
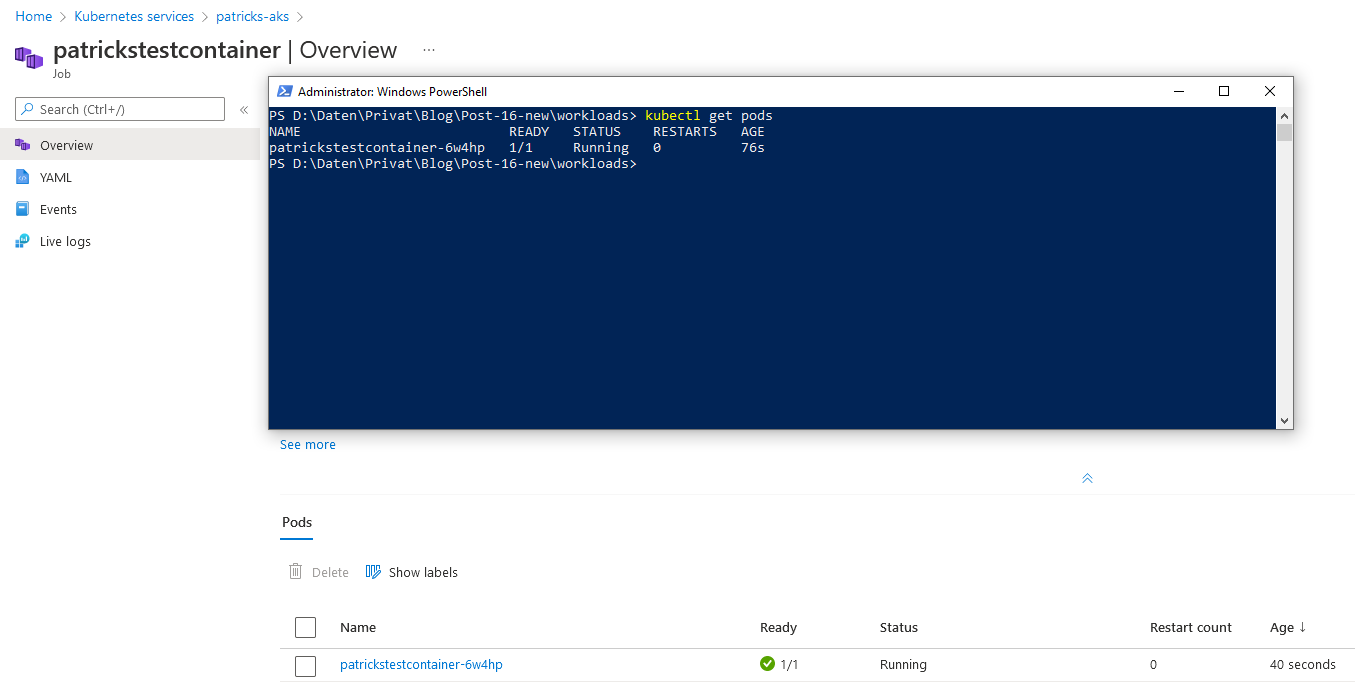
Finally, “patrickstestcontainer” appears at “Workloads”–>“Jobs”:
Clicking at “patrickstestcontainer”, reveals the Kubernetes Pod named “patrickstestcontainer-6w4hp”, this can be proven by entering following command…
kubectl get pods
…which returns a list of your Kubernetes Pods.
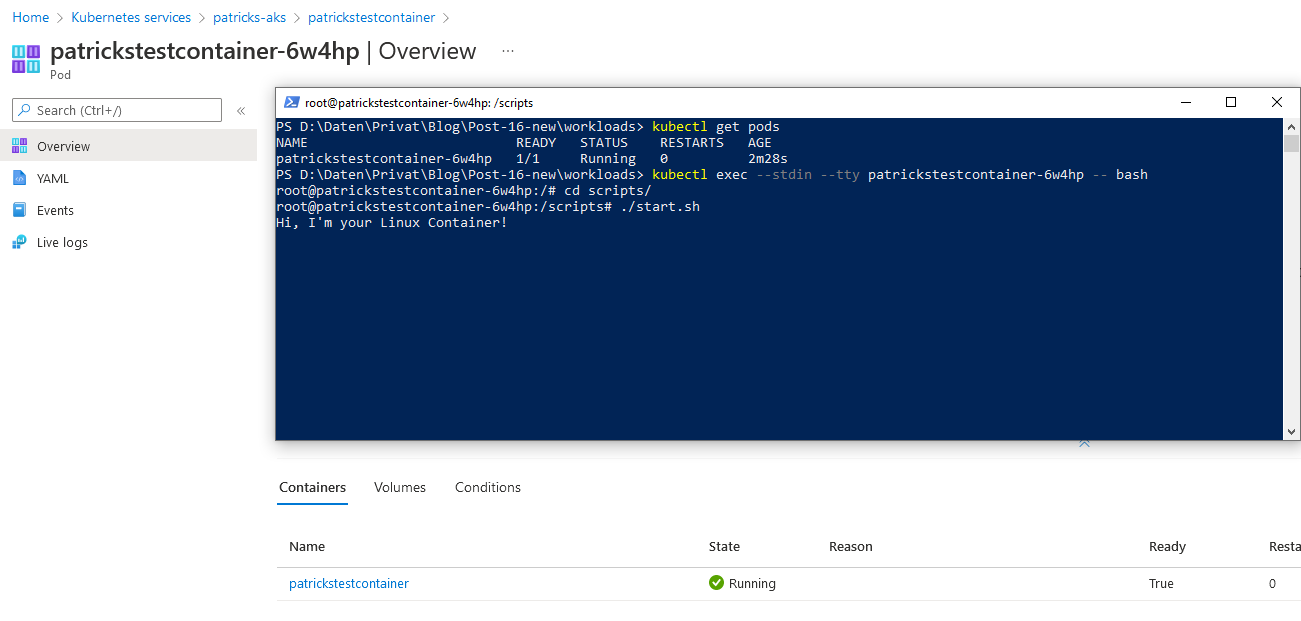
In addition, you can attach the Container by conducting:
kubectl exec --stdin --tty patrickstestcontainer-6w4hp -- bash
Change the directory within the file system of the Container to “scripts/” and execute “./start.sh” - it returns “Hi, I’m your Linux Container!”
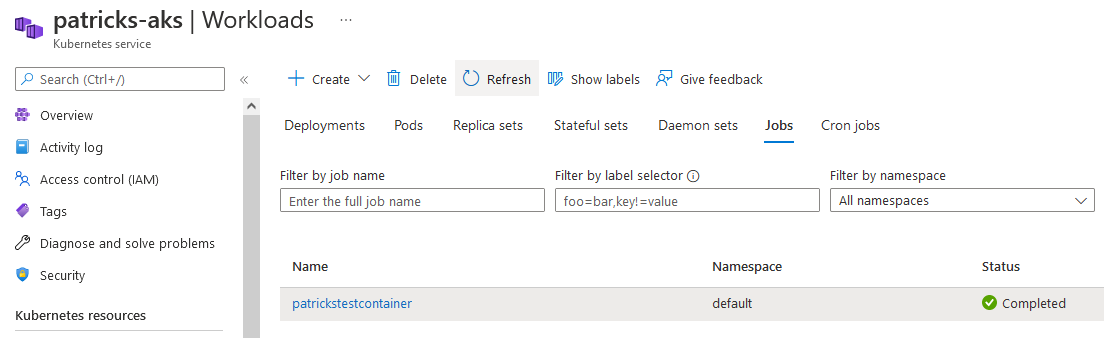
After a few minutes, the Job completes:
6. Destroying the Ressources
The resources, defined in the Terraform configuration file, can be as easy deprovisioned as they are created.
Therefore enter following command and confirm it with “yes”:
terraform destroy
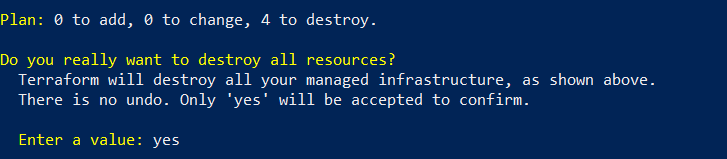
This will destroy all previously provisioned resources.
7. Error Handling
This section is about explaining common mistakes with regard to the settings, respectively rules of the resources of the Terraform configuration file.
7.1 Deprecated SKU - Provisioning fails
Getting an error message (as seen below) after running the terraform apply command indicates that you’ve set a wrong “sku” or you didn’t use a proper “sku”:

To prevent that, use
sku = "Premium"
in your Container registry related resource:
resource "azurerm_container_registry" "patricks-acr" {
  name                = "patricksblog"
  sku                 = "Premium"
  resource_group_name = azurerm_resource_group.patricks-rg.name
  location            = azurerm_resource_group.patricks-rg.location
}
7.2 ErrImagePull - Container Image can’t be pulled
This indicates, that the Kubernetes cluster is not capable of pulling the refered Container Image from the Container registry:
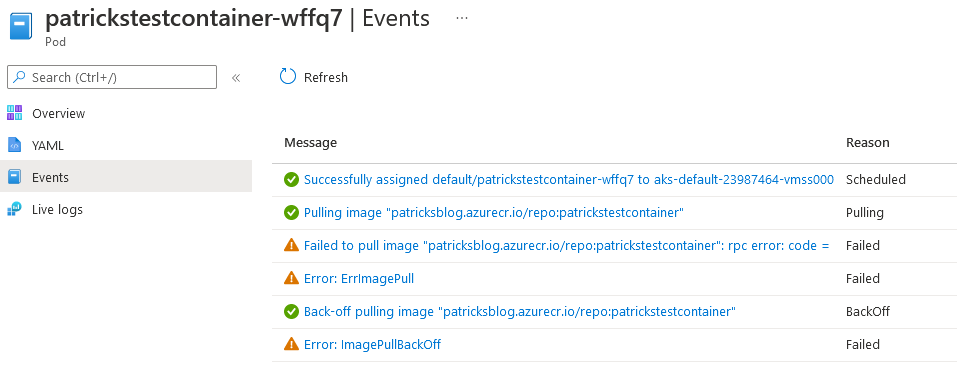
For preventing that, use this specific resource for allowing the Kubernetes cluster to pull the image:
resource "azurerm_role_assignment" "enablePulling" {
  principal_id                     = azurerm_kubernetes_cluster.patricks-k8s-cluster.kubelet_identity[0].object_id
  role_definition_name             = "AcrPull"
  scope                            = azurerm_container_registry.patricks-acr.id
  skip_service_principal_aad_check = true
}
8. Conclusion
Terraform is a powerful Infrastructure As Code tool and harmonizes well with Azure. The provisioning of the four resources can be done within a few minutes. After that, you are ready to deploy Workloads at this newly created Kubernetes cluster. It is easy to find proper templates, respectively example usages of the different resources - it is well documented. In chapter 7, I’ve explained two common mistakes - I’ve accidentally stumbled over both. If you’re aware of some important Azure CLI and kubectl commands, it is an amazingly fast and smooth way to get a microservice ready in Azure for deploying your Workloads. The provisioning of the resources and the deployment of the workload was done in approximately 30 minutes.
Azure and Terraform represent an attractive combination!
9. References
registry.terraform.io - kubernetes cluster
registry.terraform.io - container registry