This post explains a reusable Terraform module, for deploying Windows virtual machines on Azure
Introduction - why and when should you use modules?
You have already gained some experience with creating Terraform configurations to deploy different resources. For example: a configuration, which provisions a single Windows virtual machine on Azure. Imagine that you’d need a configuration that can be used for deploying two instances of that Windows virtual machine instead of one: this means that you’d need to adapt the existing configuration, which might lead to code duplication. In that situation, you’d be glad to have a solution to reuse your configuration somehow. At that time, you are ready to write your own modules. In this post, I’d like to explain the concept of Terraform modules, with examples of Windows virtual machines.
Reference
https://developer.hashicorp.com/terraform/language/modules
Deploying two Windows virtual machines without using modules
Imagine you don’t want to use Terraform modules for writing a configuration that deploys two Windows virtual machines. The Terraform configuration below shows a possible solution for that, distributed to three files:
- providers.tf: contains the Terraform block and the provider block
- variables.tf: contains variable definitions, which are used in the “main.tf” file
- main.tf: contains the necessary resource blocks (among others: azurerm_windows_virtual_machine, azurerm_network_interface, azurerm_public_ip) for creating two Windows virtual machines
providers.tf
The mandatory Terraform block and the provider block are included in the “providers.tf” file. The state file will be managed by using a Storage Account. That’s optional - simply delete the backend block if you would like to manage the state file locally.
terraform {
  required_providers {
    azurerm = {
      source  = "hashicorp/azurerm"
      version = "~> 2.65"
    }

    random = {
      source  = "hashicorp/random"
      version = "3.1.0"
    }
  }

  # Delete the backend block if you want to store the state locally
  backend "azurerm" {
    resource_group_name  = "devopsexperiences-storage"
    storage_account_name = "alien39"
    container_name       = "terraformstate"
    key                  = "terraform.tfstate"
  }

  required_version = ">= 0.14.9"
}

provider "azurerm" {
  features {}
}
variables.tf
A variable is defined for the password of the virtual machine, respectively for the virtual machine size:
variable "my_virtual_machine_password" {
  default     = "P@$$w0rd1234!"
  description = "Password of the Virtual Machine"
}

variable "my_virtual_machine_size" {
  default     = "Standard_D2_v4"
  description = "Size of the Virtual Machine"
}
main.tf
Don’t be scared, the following file seems to be complex and much too looooong: it is including resource blocks for two Windows virtual machines, named “windows11-vm-1” and “windows11-vm-2”. A virtual machine must have a network interface, and for establishing an rpd connection a public IP address. In addition, a network security group is also included by using the corresponding resource block. The network security group can be used for both virtual machines, but this does not work for the IP address, respectively for the network interface. Because of that, you can notice code duplication in the “main.tf” file. Nevertheless, it is a valid configuration which is capable for deploying two instances of a Windows 11 virtual machine:
resource "azurerm_resource_group" "rg" {
  name     = "iac-azure-terraform"
  location = "westeurope"
}

resource "azurerm_availability_set" "myavailabilityset" {
  name                = "example-aset"
  location            = azurerm_resource_group.rg.location
  resource_group_name = azurerm_resource_group.rg.name
}

resource "azurerm_virtual_network" "vnet" {
  name                = "vNet"
  address_space       = ["10.0.0.0/16"]
  location            = azurerm_resource_group.rg.location
  resource_group_name = azurerm_resource_group.rg.name
}

resource "azurerm_subnet" "subnet" {
  name                 = "internal"
  resource_group_name  = azurerm_resource_group.rg.name
  virtual_network_name = azurerm_virtual_network.vnet.name
  address_prefixes     = ["10.0.2.0/24"]
}

resource "azurerm_public_ip" "my-public-ip-vm-1" {
  name                = "public-ip-vm-1"
  resource_group_name = azurerm_resource_group.rg.name
  location            = azurerm_resource_group.rg.location
  allocation_method   = "Dynamic"
}

resource "azurerm_public_ip" "my-public-ip-vm-2" {
  name                = "public-ip-vm-2"
  resource_group_name = azurerm_resource_group.rg.name
  location            = azurerm_resource_group.rg.location
  allocation_method   = "Dynamic"
}

resource "azurerm_network_interface" "networkinterface-vm-1" {
  name                = "my-network-interface-vm-1"
  location            = azurerm_resource_group.rg.location
  resource_group_name = azurerm_resource_group.rg.name

  ip_configuration {
    name                          = "internal"
    subnet_id                     = azurerm_subnet.subnet.id
    private_ip_address_allocation = "Dynamic"

    public_ip_address_id = azurerm_public_ip.my-public-ip-vm-1.id
  }
}

resource "azurerm_network_interface" "networkinterface-vm-2" {
  name                = "network-interface-vm-2"
  location            = azurerm_resource_group.rg.location
  resource_group_name = azurerm_resource_group.rg.name

  ip_configuration {
    name                          = "internal"
    subnet_id                     = azurerm_subnet.subnet.id
    private_ip_address_allocation = "Dynamic"

    public_ip_address_id = azurerm_public_ip.my-public-ip-vm-2.id
  }
}

# Windows 11 Virtual Machine
resource "azurerm_windows_virtual_machine" "my-vm-1" {
  name                = "windows11-vm-1"
  resource_group_name = azurerm_resource_group.rg.name
  location            = azurerm_resource_group.rg.location
  size                = var.my_virtual_machine_size
  admin_username      = "adminuser"
  admin_password      = var.my_virtual_machine_password
  availability_set_id = azurerm_availability_set.myavailabilityset.id
  network_interface_ids = [
    azurerm_network_interface.networkinterface-vm-1.id,
  ]

  os_disk {
    caching              = "ReadWrite"
    storage_account_type = "Standard_LRS"
  }

  source_image_reference {
    publisher = "MicrosoftWindowsDesktop"
    offer     = "windows-11"
    sku       = "win11-21h2-avd"
    version   = "latest"
  }
}

resource "azurerm_windows_virtual_machine" "my-vm-2" {
  name                = "windows11-vm-2"
  resource_group_name = azurerm_resource_group.rg.name
  location            = azurerm_resource_group.rg.location
  size                = var.my_virtual_machine_size
  admin_username      = "adminuser"
  admin_password      = var.my_virtual_machine_password
  availability_set_id = azurerm_availability_set.myavailabilityset.id
  network_interface_ids = [
    azurerm_network_interface.networkinterface-vm-2.id,
  ]

  os_disk {
    caching              = "ReadWrite"
    storage_account_type = "Standard_LRS"
  }

  source_image_reference {
    publisher = "MicrosoftWindowsDesktop"
    offer     = "windows-11"
    sku       = "win11-21h2-avd"
    version   = "latest"
  }
}

# Security Group - allowing RDP Connection
resource "azurerm_network_security_group" "sg-rdp-connection" {
  name                = "allowrdpconnection"
  location            = azurerm_resource_group.rg.location
  resource_group_name = azurerm_resource_group.rg.name

  security_rule {
    name                       = "rdpport"
    priority                   = 100
    direction                  = "Inbound"
    access                     = "Allow"
    protocol                   = "Tcp"
    source_port_range          = "*"
    destination_port_range     = "3389"
    source_address_prefix      = "*"
    destination_address_prefix = "*"
  }

  tags = {
    environment = "Testing"
  }
}

# Associate security group with network interface
resource "azurerm_network_interface_security_group_association" "vm-1" {
  network_interface_id      = azurerm_network_interface.networkinterface-vm-1.id
  network_security_group_id = azurerm_network_security_group.sg-rdp-connection.id
}

resource "azurerm_network_interface_security_group_association" "vm-2" {
  network_interface_id      = azurerm_network_interface.networkinterface-vm-2.id
  network_security_group_id = azurerm_network_security_group.sg-rdp-connection.id
}
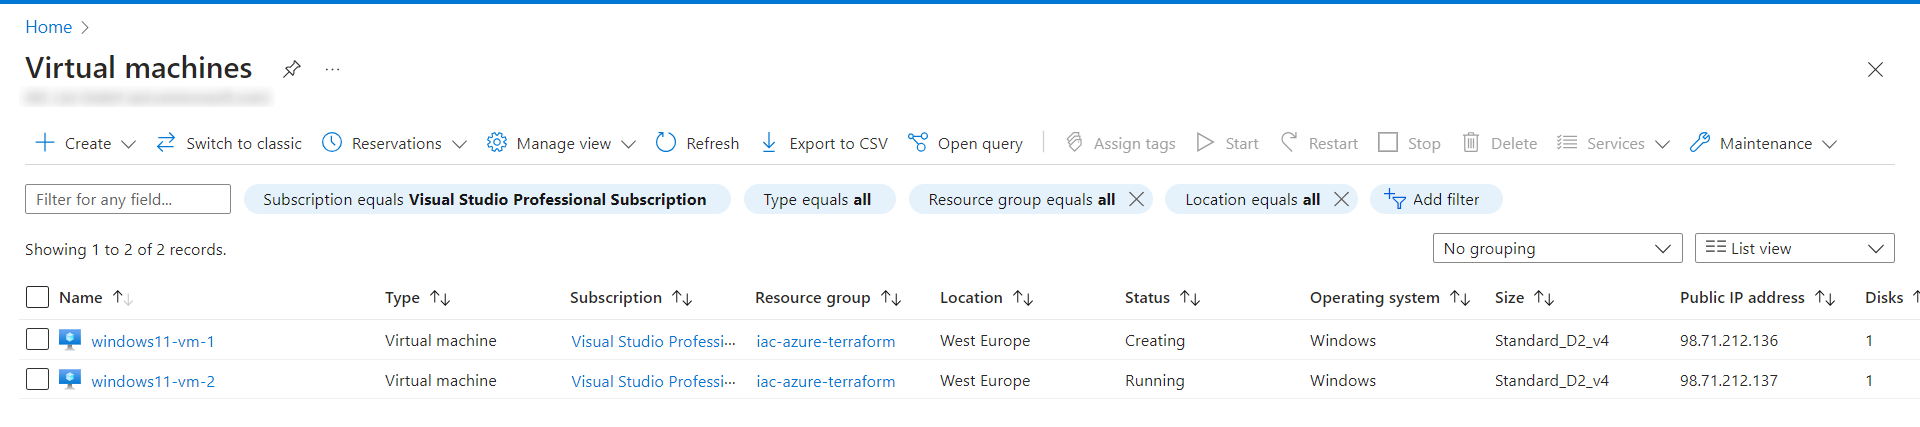
By applying it, you will see the instances of the Windows virtual machines after a few minutes in the Azure Portal:
Reviewing the configuration
In a nutshell: the Terraform configuration deploys (as expected) the virtual machines, which is the purpose of it. Probably you are still not that happy with that code, because of the mentioned code duplication. Following Terraform resource blocks occur always twice, which are almost identical:
- azurerm_windows_virtual_machine
- azurerm_network_interface
- azurerm_public_ip
- azurerm_network_interface_security_group_association
You can find this Terraform configuration at: github.com/patkoch - Terraform on Azure - Windows 11
The next chapter will explain a a different way to create a Terraform configuration, which can be used for deploying two different Windows virtual machines - by using Terraform modules.
Deploying two Windows 11 virtual machines using modules
What is a module?
When we talk about a module, then we refer to several .tf (and/or .tf.json) files, which are located in a directory. Sounds like the definition of an ordinary Terraform configuration, right? That’s true, because each Terraform configuration (for example, the one in the previous chapter) already has a module - which is named root module. But the intention of the .tf files of a (child) module is to be reusable. The configuration of the chapter “Deploying two Windows 11 virtual machines without using modules” proved that it’s not intended for being reused. For instance: if you would like to increase the instances of the virtual machines, then you need to adapt the main.tf file.
Reference
https://developer.hashicorp.com/terraform/language/modules
The structure of the modules
The following Terraform configuration, which used modules, can be found at github.com/patkoch - Terraform on Azure - Modules Windows virtual machines Let’s figure out how the deployment of two virtual machines works by using the Terraform modules:
I’d like to start with the structure of the files, respectively the directories, which can be seen in the picture below:
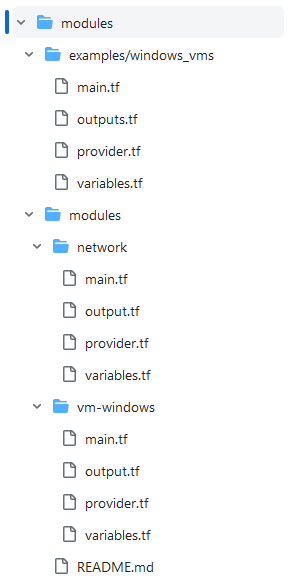
There are five directories and several Terraform files:
- The directory named “examples”, which includes the directory “windows_vms”
- The directory “modules” (on the same level as “examples”), including the directories “network” and “vm-windows”
“network” and “vm-windows” serve as so called child modules, and the content of the directory “windows_vms” can be refered as root module - because it is possible to call the modules “network” and “vm-windows” several times from it.
Calling the child modules from the root module
I’m calling the mentioned child modules (“network” and “vm-windows”) from the root module within the file “main.tf” (“examples/windows_vms”). Let’s explain this file in a little more detail:
examples/windows_vms/main.tf
- The module “network” is called one time
- The module “vm-windows” is called two times, for deploying one Windows 10 virtual machine and one Windows 11 virtual machine.
The statement starting with source refers to the location of the configuration of the corresponding child module, e.g.:
source = "../../modules/vm-windows"
The content of that file looks organized: at first a resource group is defined. After that, there are three calls of the child modules:
The first call is about the deployment of network-related resources. The second and the third call are about the creation of the virtual machines:
resource "azurerm_resource_group" "rg" {
  name     = "${var.tenant_name}-rg"
  location = var.resource_group_location
}

module "network" {
  source = "../../modules/network"

  tenant_name = var.tenant_name
  subnet_name = var.my_subnet_name
  resource_group_location = var.resource_group_location
  resource_group_name = azurerm_resource_group.rg.name
}

module "vm-windows-10" {
  source = "../../modules/vm-windows"

  my_virtual_machine_name = var.my_virtual_machine_name_win10
  my_virtual_machine_password = var.my_virtual_machine_password_win10
  my_virtual_machine_size = var.my_virtual_machine_size
  location = var.resource_group_location
  resource_group_name = azurerm_resource_group.rg.name
  azurerm_subnet_id = module.network.azurerm_subnet_id
  source_image_offer = var.source_image_offer_win10
  source_image_sku = var.source_image_sku_win10
  network_interface_name = var.network_interface_name_win10
  public_ip_address_name = var.public_ip_address_name_win10
}

module "vm-windows-11" {
  source = "../../modules/vm-windows"

  my_virtual_machine_name = var.my_virtual_machine_name_win11
  my_virtual_machine_password = var.my_virtual_machine_password_win11
  my_virtual_machine_size = var.my_virtual_machine_size
  location = var.resource_group_location
  resource_group_name = azurerm_resource_group.rg.name
  azurerm_subnet_id = module.network.azurerm_subnet_id
  source_image_offer = var.source_image_offer_win11
  source_image_sku = var.source_image_sku_win11
  network_interface_name = var.network_interface_name_win11
  public_ip_address_name = var.public_ip_address_name_win11
}
How do you know, which assignments you have to insert inside of a “module” block? For that, check the “variables.tf” of the corresponding module. The code below shows the content of the “variables.tf” of the “network” module. There are four variables defined, and those four variables have to have real values. Those values will be set by calling the module from the root module.
modules/network/variables.tf
variable "tenant_name" {
  type    = string
  description = "Name of the tenant, respectively the organization"
}

variable "subnet_name" {
  type    = string
  description = "Name of the subnet"
}

variable "resource_group_location" {
  type    = string
  description = "Location of the resources"
}

variable "resource_group_name" {
  type    = string
  description = "Name of the resource group, which contains the resources"
}
}
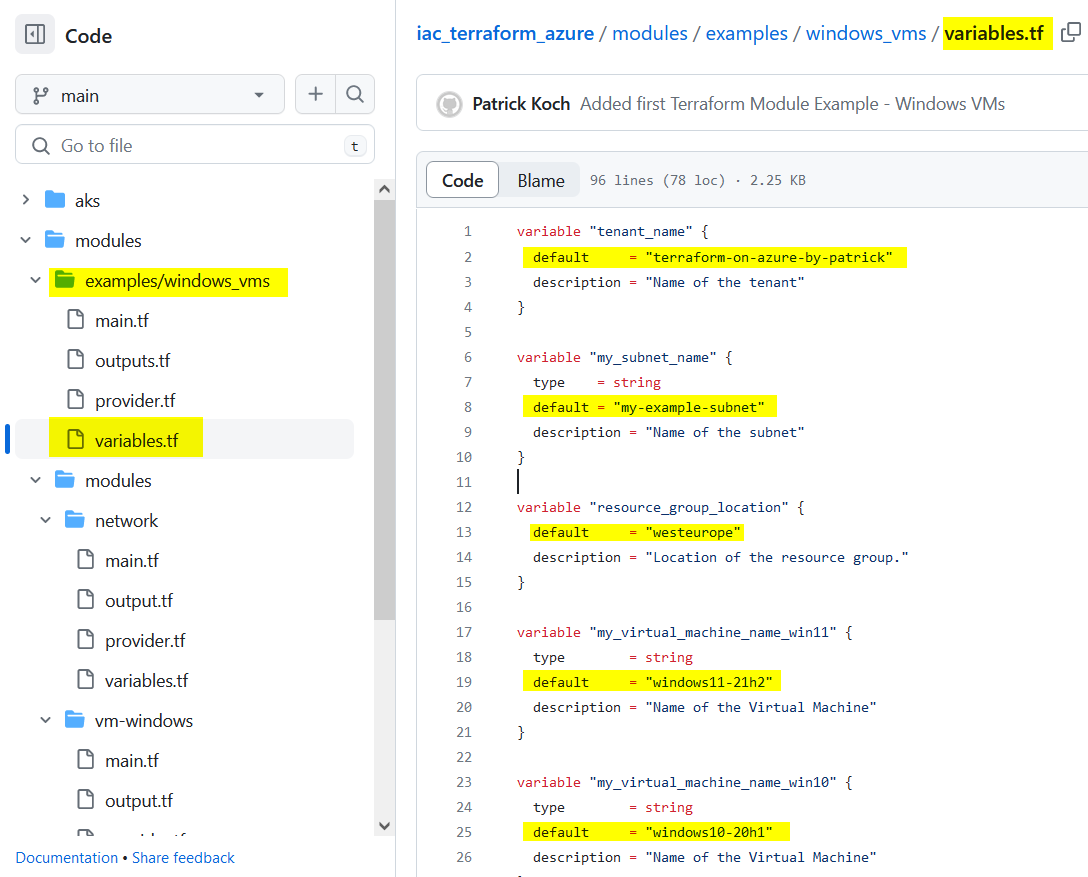
examples/windows_vms/variables.tf
In my example, the concrete values are the default values of the “variables.tf” file from the root module:
Reference
https://developer.hashicorp.com/terraform/language/modules
The child modules
This chapter is about explaining the child modules in more detail.
The network child module
Of course, we need a virtual network, including a subnet, etc. for the virtual machines. Therefore, the child module named “network” was created, which structure can be seen in the picture below:
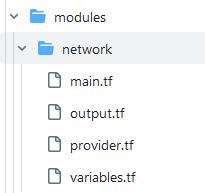
- main.tf: contains the resources related to the network, which belong together: the Azure virtual network and the subnet.
- output.tf: the defined “Outputs” are essential values which need to be revealed for the other modules
- provider.tf: contains the Terraform and the provider block
- variables.tf: consists of defined variables
The code below shows the content of the file “main.tf” of the “network” child module: it includes a resource block for the virtual network, and a dedicated resource block for a subnet:
modules/network/main.tf
resource "azurerm_virtual_network" "vnet" {
  name                = "${var.tenant_name}-vNet"
  address_space       = ["10.0.0.0/16"]
  location            = var.resource_group_location
  resource_group_name = var.resource_group_name
}

resource "azurerm_subnet" "subnet" {
  name                 = var.subnet_name
  resource_group_name  = var.resource_group_name
  virtual_network_name = azurerm_virtual_network.vnet.name
  address_prefixes     = ["10.0.2.0/24"]
}
The variables (starting with the prefix “var.”), are defined in the corresonding “variables.tf” file in the directory “network”.
Of particular interest is the file “output.tf”, which defines three outputs:
modules/network/output.tf
output "azurerm_virtual_network_name" {
    value = azurerm_virtual_network.vnet.name
}

output "azurerm_virtual_network_id" {
    value = azurerm_virtual_network.vnet.id
}

output "azurerm_subnet_id" {
    value = azurerm_subnet.subnet.id
}
What is the purpose of the “output.tf” file? By deploying a network, you will get values for the Azure virtual network name, the id, and the subnet id. Those values need to be available for the root module.
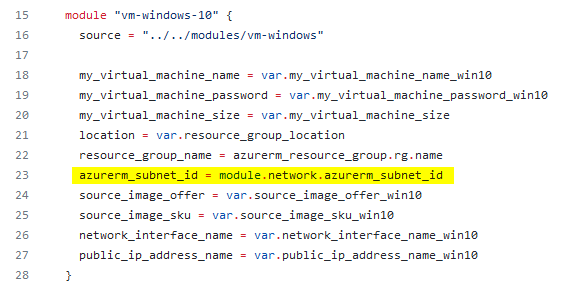
For instance:
The picture below shows the call of the child module “vm-windows” in line 15 which is done from the root module: the virtual machine needs among others a subnet id (see line 23), but the subnet id “is part” of the other child module - the network child module, which is called before. So, the subnet id already exists at this time, and therefore it is necessary to provide the information about the subnet id somehow to the root module. For that, outputs are defined to return the dedicated values.
examples/windows_vms/main.tf
Reference
https://developer.hashicorp.com/terraform/language/values/outputs
The vm-windows child module
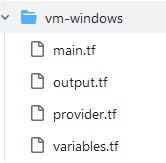
The structure of that directory is similar to the “network” module: there are again four Terraform files included:
Let’s have a closer look at the “main.tf” file: also, this file looks organized, without any duplication of any resource block. Almost all configuration options get their concrete values from a variable:
modules/vm-windows/main.tf
resource "azurerm_availability_set" "myavailabilityset" {
  name                = "example-aset"
  location            = var.location
  resource_group_name = var.resource_group_name
}

resource "azurerm_public_ip" "my-public-ip" {
  name                = var.public_ip_address_name
  resource_group_name = var.resource_group_name
  location            = var.location
  allocation_method   = "Dynamic"

  tags = {
    environment = "Testing"
  }
}

resource "azurerm_network_interface" "mynetworkinterface" {
  name                = var.network_interface_name
  location            = var.location
  resource_group_name = var.resource_group_name

  ip_configuration {
    name                          = "internal"
    subnet_id                     = var.azurerm_subnet_id
    private_ip_address_allocation = "Dynamic"

    public_ip_address_id = azurerm_public_ip.my-public-ip.id
  }
}

# Windows virtual machine
resource "azurerm_windows_virtual_machine" "myvirtualmachine" {
  name                = var.my_virtual_machine_name
  resource_group_name = var.resource_group_name
  location            = var.location
  size                = var.my_virtual_machine_size
  admin_username      = "adminuser"
  admin_password      = var.my_virtual_machine_password
  availability_set_id = azurerm_availability_set.myavailabilityset.id
  network_interface_ids = [
    azurerm_network_interface.mynetworkinterface.id,
  ]

  os_disk {
    caching              = "ReadWrite"
    storage_account_type = "Standard_LRS"
  }

  source_image_reference {
    publisher = "MicrosoftWindowsDesktop"
    offer     = var.source_image_offer
    sku       = var.source_image_sku
    version   = "latest"
  }
}

# Security Group for allowing RDP Connection
resource "azurerm_network_security_group" "sg-rdp-connection" {
  name                = "allowrdpconnection"
  location            = var.location
  resource_group_name = var.resource_group_name

  security_rule {
    name                       = "rdpport"
    priority                   = 100
    direction                  = "Inbound"
    access                     = "Allow"
    protocol                   = "Tcp"
    source_port_range          = "*"
    destination_port_range     = "3389"
    source_address_prefix      = "*"
    destination_address_prefix = "*"
  }

  tags = {
    environment = "Testing"
  }
}

# Associate security group with network interface
resource "azurerm_network_interface_security_group_association" "example" {
  network_interface_id      = azurerm_network_interface.mynetworkinterface.id
  network_security_group_id = azurerm_network_security_group.sg-rdp-connection.id
}
In contrast to the “main.tf” file, the file “output.tf” (which can be seen in the code snippet below) is not very spectaculal: just the public address is returned after deploying the virtual machine.
modules/vm-windows/output.tf
output "azurerm_public_ip_address" {
    value = azurerm_public_ip.my-public-ip.ip_address
}
Applying the configuration including the modules
Now it’s time to deploy the virtual machines on Azure. For that, I’ll change the directory to “modules/examples/windows_vms”, to the root module, and which serves as an example of how to call the child modules.
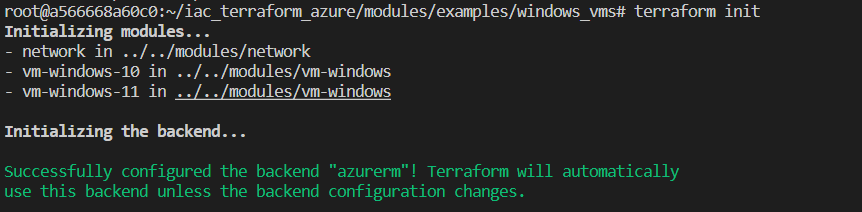
Conducting terraform init already indicates, that modules are used:
After that, I’ll execute the commands terraform validate, and terraform apply:
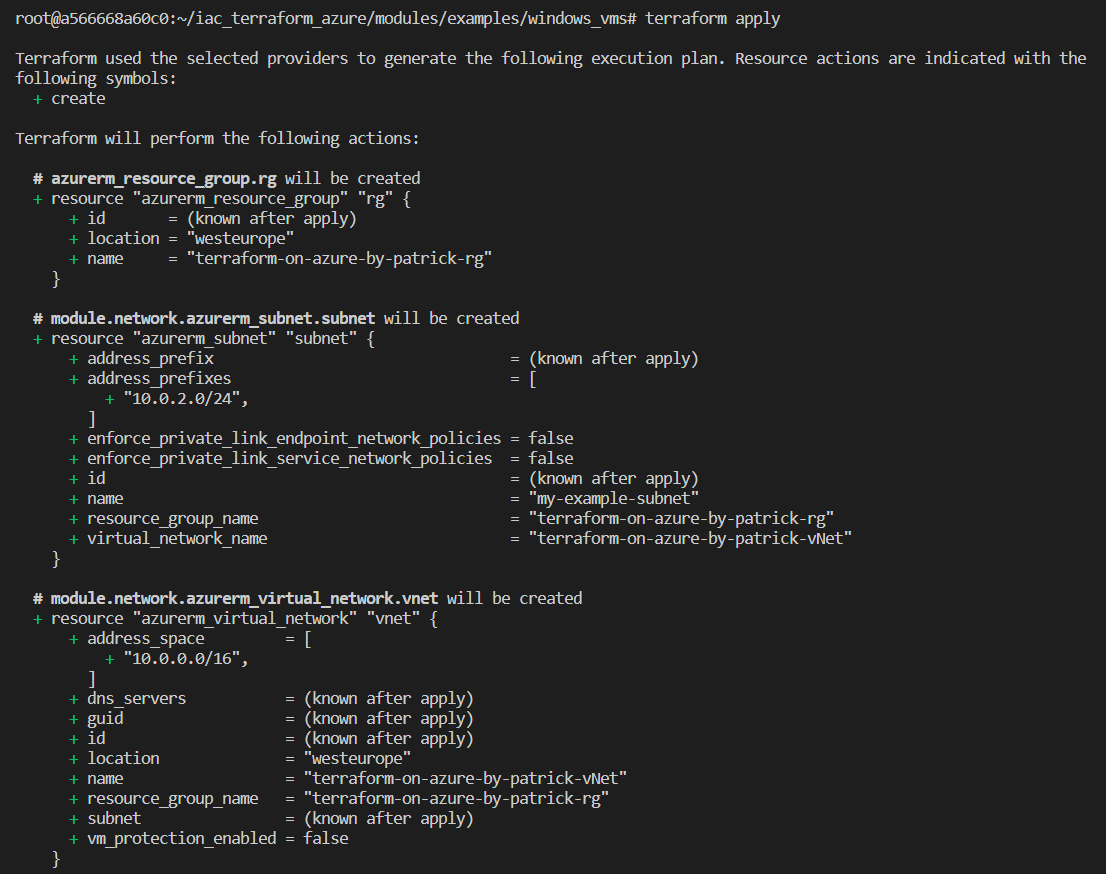
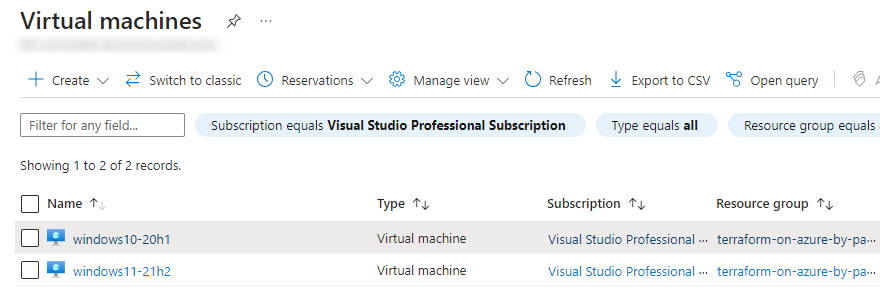
I’ll confirm my intention to the deployment of the resources by typing “yes” and after a few minutes, two Windows virtual machines are deployed. They also appear in the Azure portal:
Summary
Whether you use the configuration without using modules or the one with modules - you’ll get the same result: the deployment of two Windows virtual machines.
In contrast to the Terraform configuration without using modules, a new instance of a virtual machine can be easily added by implementing an additional call of the child module “vm-windows” and by providing the concrete values for that. There is no need to adapt the content of the child modules, which define the resources related to the virtual machines and to the network.
So, Terraform modules are ideal if you would like to reuse your configurations. By implementing modules you will switch to a “hierarchical system”, as you are going to call your child modules (which can be done multiple times) from a root module. Be aware to follow best practices according to the composition of the modules, which can be found at the following link:
https://developer.hashicorp.com/terraform/language/modules/develop/composition
References
https://developer.hashicorp.com/terraform/language/modules https://developer.hashicorp.com/terraform/language/modules/develop https://developer.hashicorp.com/terraform/language/values/outputs https://developer.hashicorp.com/terraform/language/modules/develop/composition