This post explains how to create and how to manage a Service Principal using the Azure CLI
1. Introduction
A few weeks ago I started to learn about Github Actions, and my first goal was to create a simple workflow, that provisions a resource group on Azure using Terraform. I created a blank .yml file, and added the necessary steps until I needed to sign in to my Azure subscription. I was used to work with Azure DevOps for establishing CI/CD pipelines, and expected something similar to a Service connection of ADO to get access from the pipeline to the Azure subscription by using this very comfortable managed approach (see also one of my previous posts Build an Azure DevOps Pipeline using YAML for provisioning a Microservice in Azure with Terraform). Now it was necessary to create a Service Principal for establishing the connection from the pipeline to my Azure subscription. I already created several Service Principals - but without taking a closer look at that concept. As I again had to deal with it, I’ve made my mind to get a better idea of it. Therefore, I also decided to write a blog post about it.
So, this blog post is intended to all who would like to start with creating, and managing a Service Principal on Azure using the Azure CLI
2. Prerequisites
3. What is a Service Prinicial?
Before you can add, change, or delete resources on Azure, you have to sign in to your Azure subscription - for sure. So it’s clear that this is also mandatory, if you would like to achieve that in automated way - in my case by using pipelines. Without a successful login to an Azure subscription, specific e.g.: Terraform commands included in a GitHub Action would not work. You would never come to the idea of using the credentials of your fully privileged user in the pipeline code. So, if you would like to achieve the login to an Azure subscription in an automated way, by using e.g. pipelines, then you should use a Service Principal. It allows automated tools, applications or hosted services to conduct the Azure authentication, but the permissions are restricted in contrast to a user identity (e.g.: your fully privileged user). Providing the Service Principal only as much as necessary permissions is recommended. Consider therefore carefully which role and which scope you set.
Reference
learn.microsoft.com - create Azure Service Principal
4. Create and manage a Service Principal
4.1 Login to your Azure subscription
The authentication to Azure has to done before a Service Principal can be created: in VS Code that’s conducted by opening a new Terminal and entering the following command:
az login
A browser session will be opened, and an account has to be chosen, which will be used for the login. After confirming the credentials, the logs should be similar to those in the picture below:

In addition, ensure that the right subscription is used. The subscription can be changed by using the following command:
az account set --subscription "<subscription id>"
Reference
learn.microsoft.com - manage Azure scubscriptions with Azure CLI
4.2 Create a Service Principal
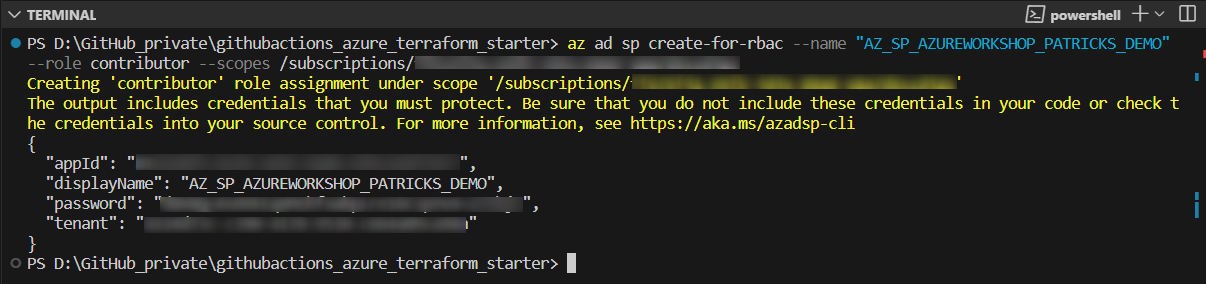
As a next step, the Service Principal has to be created. Following command is used to create a Service Principal named “AZ_SP_AZUREWORKSHOP_PATRICKS_DEMO”:
az ad sp create-for-rbac --name "AZ_SP_AZUREWORKSHOP_PATRICKS_DEMO" --role contributor --scopes /subscriptions/<subscription id>
The subscription id can be retrieved using:
az account show
Let’s take a closer look at the parameters:
- name: the desired name of the Service Principal
- role: the role, which will be assigned. There are different already existing so-called “built-in roles” on Azure. Ensure that a proper role is chosen regarding the purpose of the Service Principal - see List of built-in roles
- scope: in my example, the Service Principal gets the role “Contributor”, which will be set to the whole subscription. The scope can also be restricted to e.g. a single resource group. Set also the scope carefully - see examples regarding to the value of the scope at learn.microsoft.com - azure-cli-sp-tutorial-1
The Service Principal will be created after executing the command below. The logs will reveal several credentials, save them afterward.
References
learn.microsoft.com - azure-cli-sp-tutorial
learn.microsoft.com - az-sp-create-for-rbac
4.3 Get details of the created Service Principal
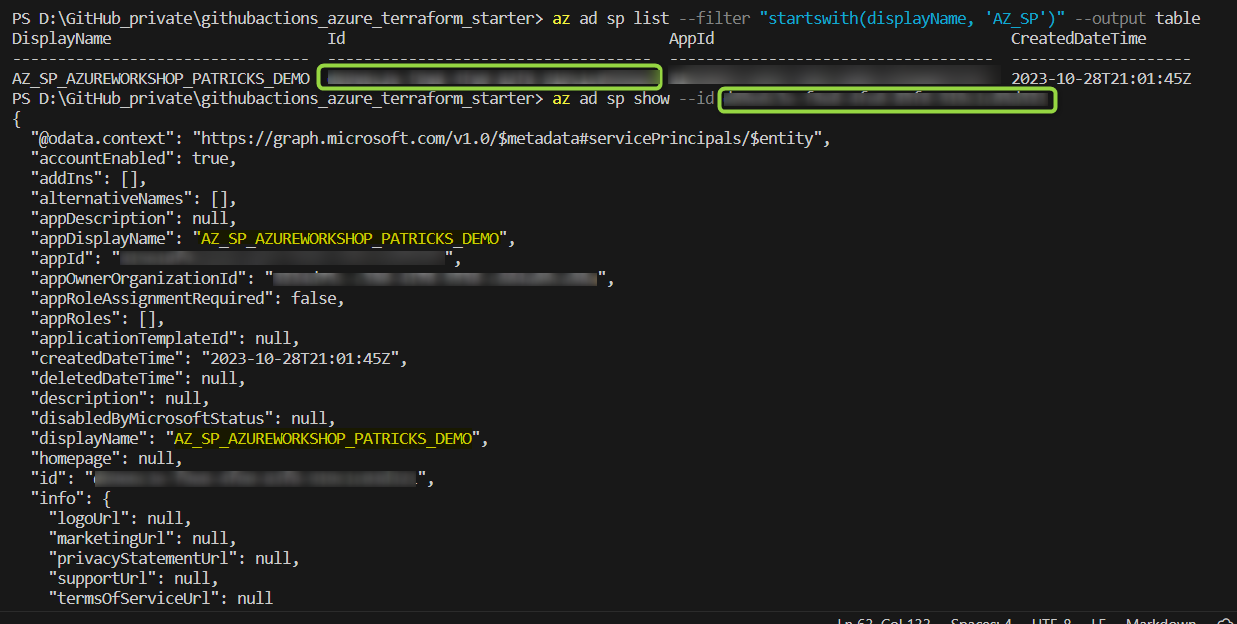
Specific details of the Service Principal can be listed by using the following command:
az ad sp list --filter "startswith(displayName, 'AZ_SP')" --output table
Executing that command, lists the DisplayName, the id, the AppId, and the *CreatedDateTime" of all Service Principals, which DisplayName starts with ‘AZ_SP’:

This reveals among others the id, which can be used for an additional command (see below) to retrieve more details.
az ad sp show --id <id of the service principal>
The green rectangle marks the id of the Service Principal:
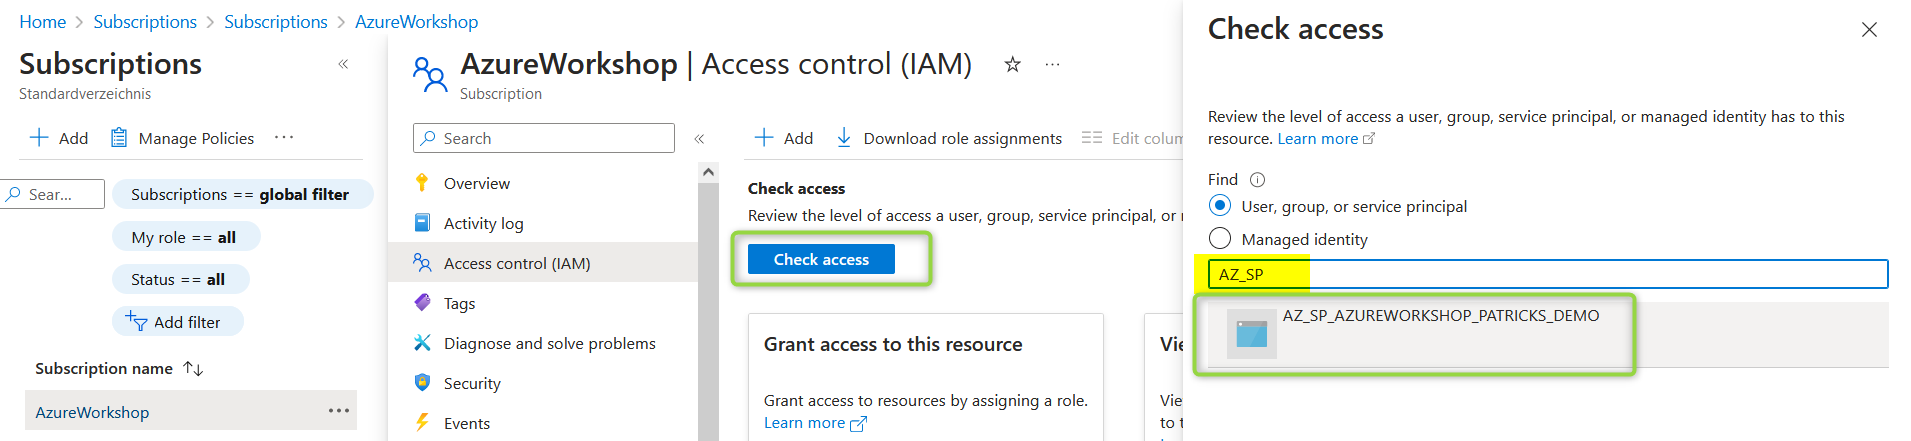
The access details can also be verified in the Azure Portal, by clicking on the “Check access” button and on the specific Service Principal in the IAM section of the subscription:
4.4 Remove permissions from a Service Principal
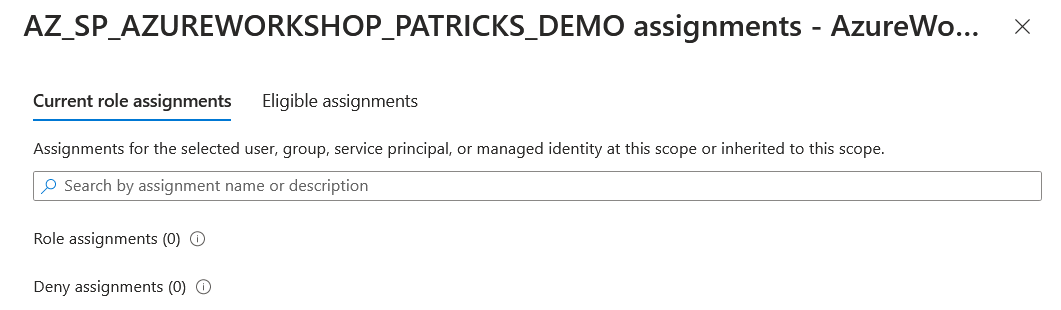
No worries if you have to reconsider the permissions that you set - they can be updated. Using the following command removes the “Contributor” role for the scope of the whole subscription from the Service Principal named “AZ_SP_AZUREWORKSHOP_PATRICKS_DEMO”:
az role assignment delete --assignee <id of the service principal> --role Contributor --scope /subscriptions/<subscription id>
Checking again the access should prove that there a no current role assignments any more:
References
learn.microsoft.com - azure-cli-sp-tutorial-5
learn.microsoft.com - azure-cli-sp-tutorial-1
4.5 Add permissions to a Service Principal
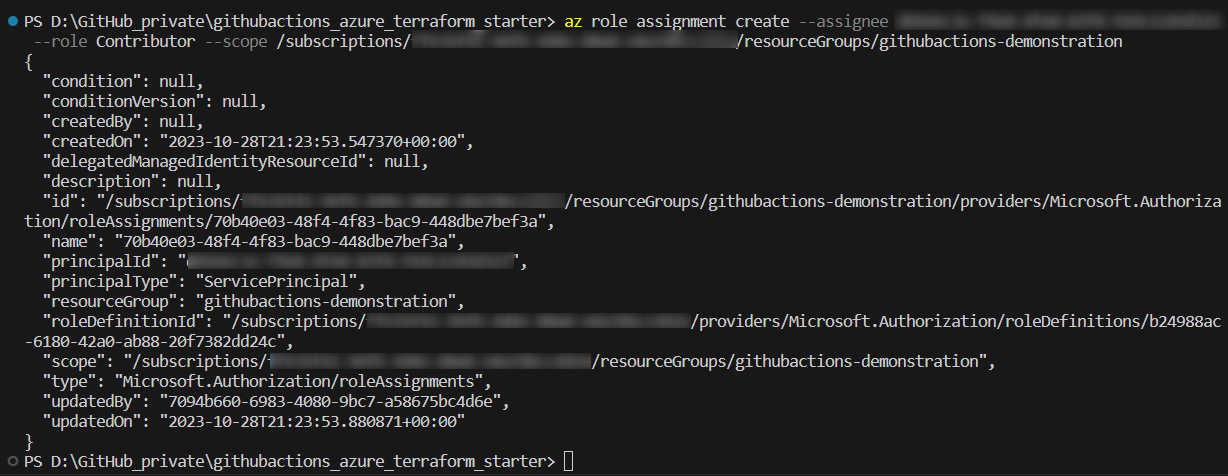
The “Contributor” role was removed, but some proper role assignments would be useful - otherwise, it is not meaningful. Those can be added using the command seen below: in that case, again a “Contributor” role will be assigned, but it is not applied for the whole subscription: the scope is now set to a specific resource group named “githubactions-demonstration” instead:
az role assignment create --assignee <id of the service principal> --role Contributor --scope /subscriptions/<subscription id>/resourceGroups/githubactions-demonstration
This restricts the permission of the Service Principal to this resource group:
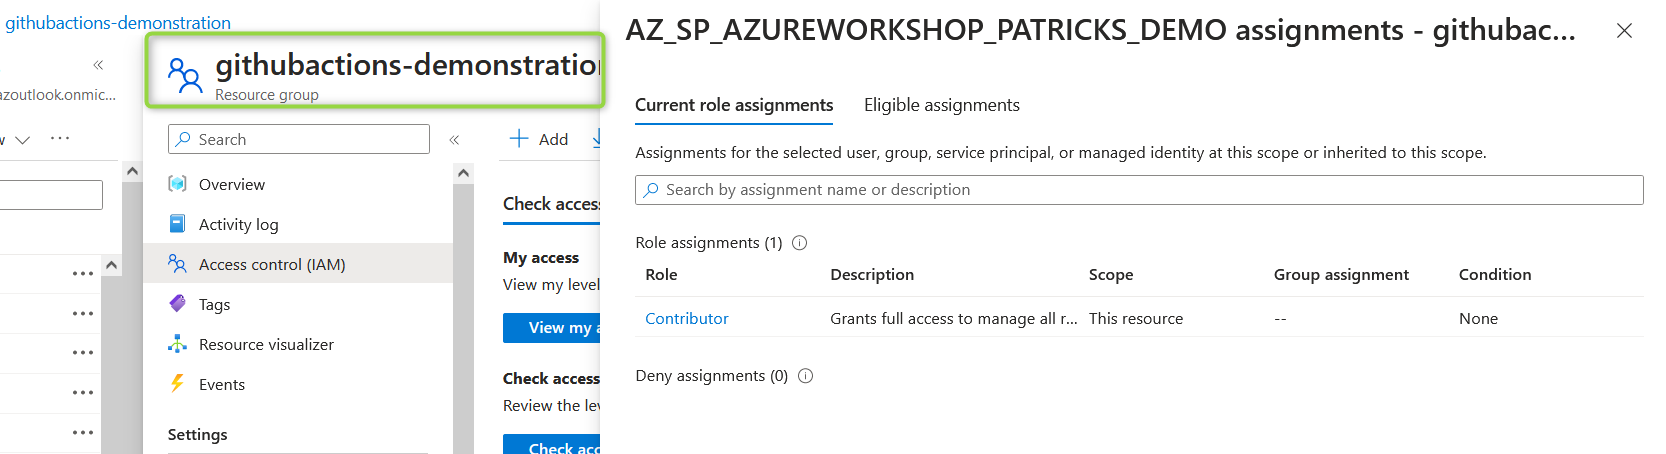
Again the access can be verified in the Azure Portal - be aware to prove that at the level of the specific resource group and not at the level for the whole subscription:
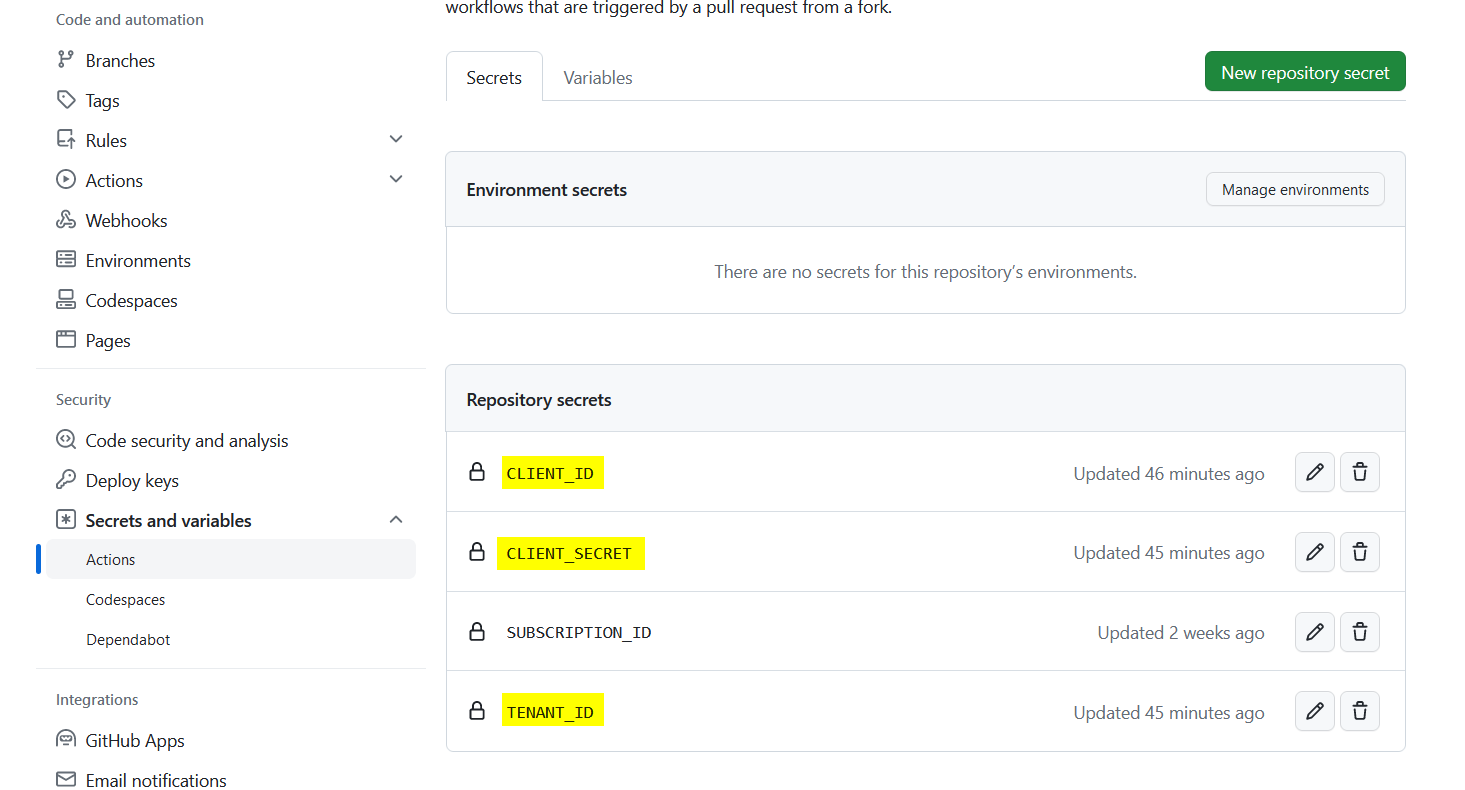
Add repository secrets in GitHub
As already mentioned, after creating the Service Principal, the following credentials will appear:
These credentials can be added as repository secrets in GitHub. Three different variables are created:
- CLIENT_ID - which gets the value of the “appId”
- CLIENT_SECRET - which gets the value of the “password”
- TENANT_ID - which gets the value of the “tenant”
Those variables can be used e.g.: in GitHub Actions to establish the connection to the Azure subscription. I’m using that approach now to automate my Azure resources with Terraform and GitHub Actions.
References
azure.microsoft - Azure subscription
learn.microsoft.com - Azure CLI
learn.microsoft.com - create Azure Service Principal
learn.microsoft.com - list of built-in roles
learn.microsoft.com - azure-cli-sp-tutorial-1
learn.microsoft.com - azure-cli-sp-tutorial-5
learn.microsoft.com - az-sp-create-for-rbac
learn.microsoft.com - az-ad-sp-list
stackoverflow.com - how-to-use-filter-with-az-ad-app-to-do-a-bulk-delete